Partner Users Must Sync Automatically? Configure Cross-Tenant Synchronization
Manually inviting every user does not scale when many users must collaborate across tenants.
Microsoft Entra cross-tenant synchronization can automatically create, update, and remove B2B collaboration users in a target tenant.
The pattern is:
Target tenant allows inbound synchronization
-> source tenant creates a synchronization configuration
-> selected source users are provisioned into the target tenant
-> lifecycle changes continue to synchronize
This is a one-way push from the source tenant to the target tenant. It is not tenant migration, password synchronization, or bidirectional directory synchronization.
When to Use Cross-Tenant Synchronization
Use it when:
- an organization owns multiple Microsoft Entra tenants
- a stable group of users needs ongoing access across tenants
- manual guest invitations create too much lifecycle work
- users must be created and removed automatically as scope changes
- selected attributes must stay aligned between tenants
For one external user or a short partnership, a normal B2B guest invitation is usually simpler.
Cross-tenant synchronization is intended primarily for multiple tenants within one organization. It can be used across organizations, but privacy, consent, regulatory, and data-minimization responsibilities must be reviewed first.
Understand Source and Target
Source tenant: owns the internal users and pushes them
Target tenant: receives B2B collaboration user objects
Only internal members from the source tenant are synchronized. External users already present in the source tenant are not forwarded to another tenant.
Users authenticate with their source identity. The synchronized target object does not contain a separate password.
Cross-tenant synchronization provisions the identity, but it does not automatically grant access to every resource. Assign the synchronized user to the required application, group, Microsoft 365 resource, or Azure RBAC role separately.
Prerequisites
For user synchronization, plan for Microsoft Entra ID P1 or P2 licensing and the required roles.
Typical roles include:
Target tenant: Security Administrator
Source tenant: Security Administrator
Source tenant: Hybrid Identity Administrator
Source tenant: Cloud Application Administrator or Application Administrator
Also collect:
- source tenant ID
- target tenant ID
- users or groups that should be synchronized
- required attribute mappings
- an owner for provisioning failures and lifecycle decisions
Use separate admin sessions or clearly label each browser profile. Configuring the correct setting in the wrong tenant is an easy mistake.
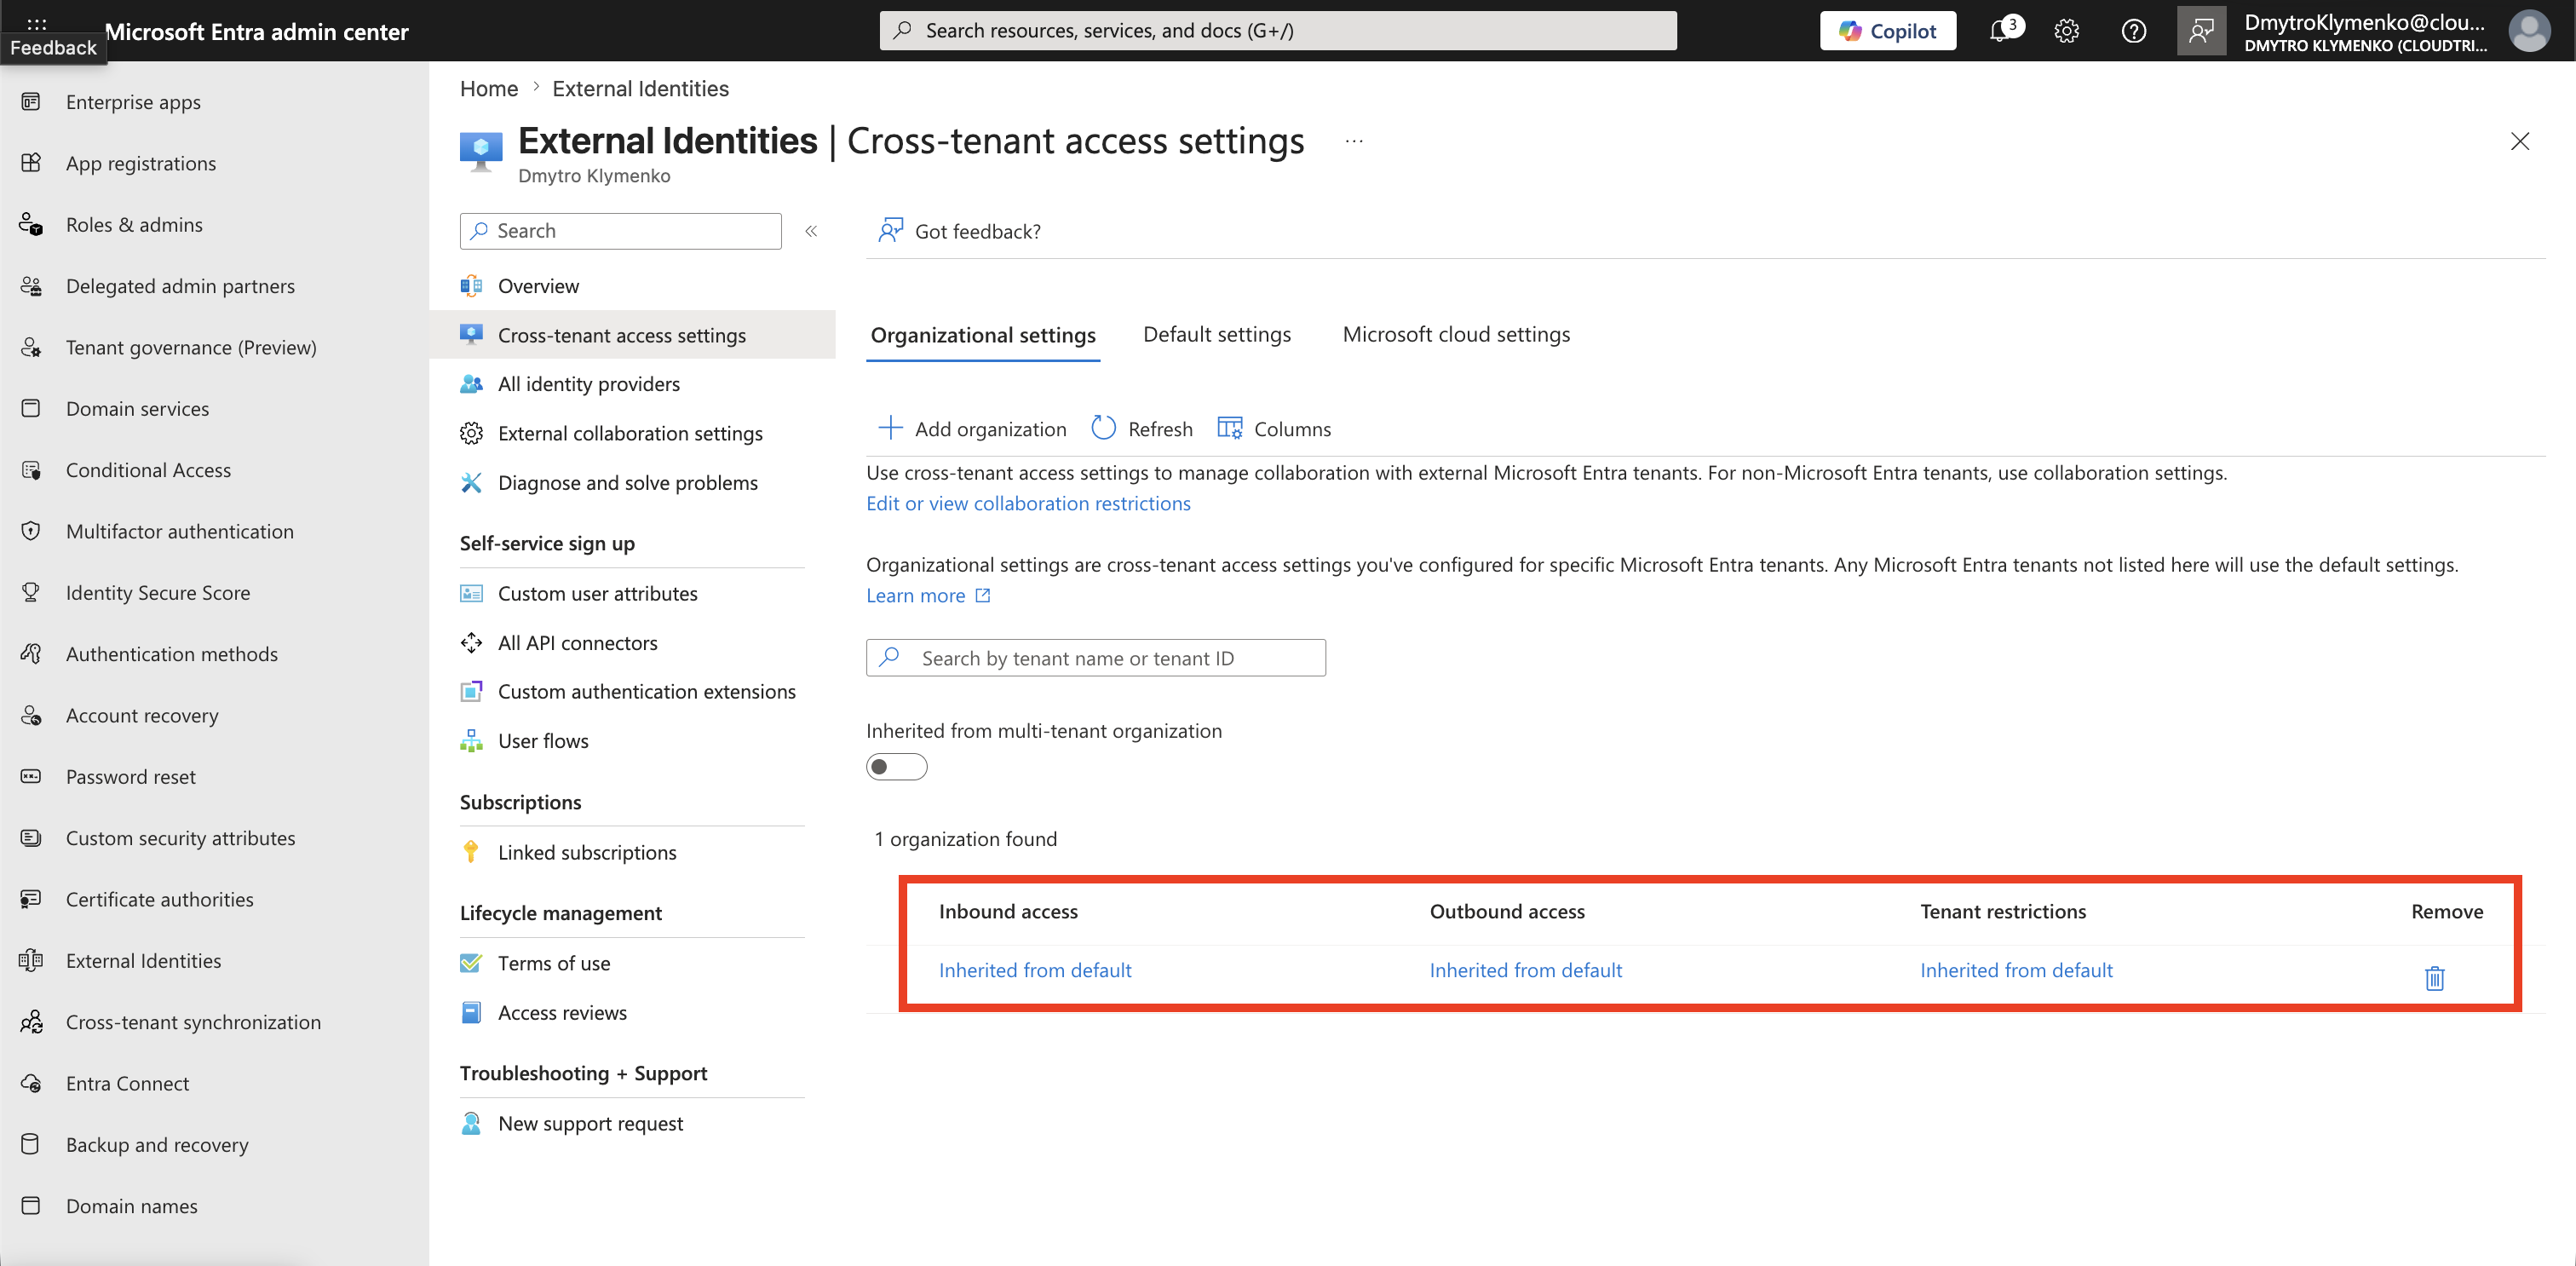
Target Tenant: Add the Source Organization
Sign in to the target tenant and open:
Microsoft Entra admin center
> Entra ID
> External Identities
> Cross-tenant access settings
> Organizational settings
Select Add organization, enter the source tenant ID or verified domain, verify the result, and select Add.
Target Tenant: Allow Inbound Synchronization
In the source organization row, select the link under Inbound access.
Open:
Cross-tenant syncEnable:
Allow user synchronization into this tenantGroup synchronization has separate licensing and may be shown as an additional option. Enable it only if synchronized group objects are part of the design.
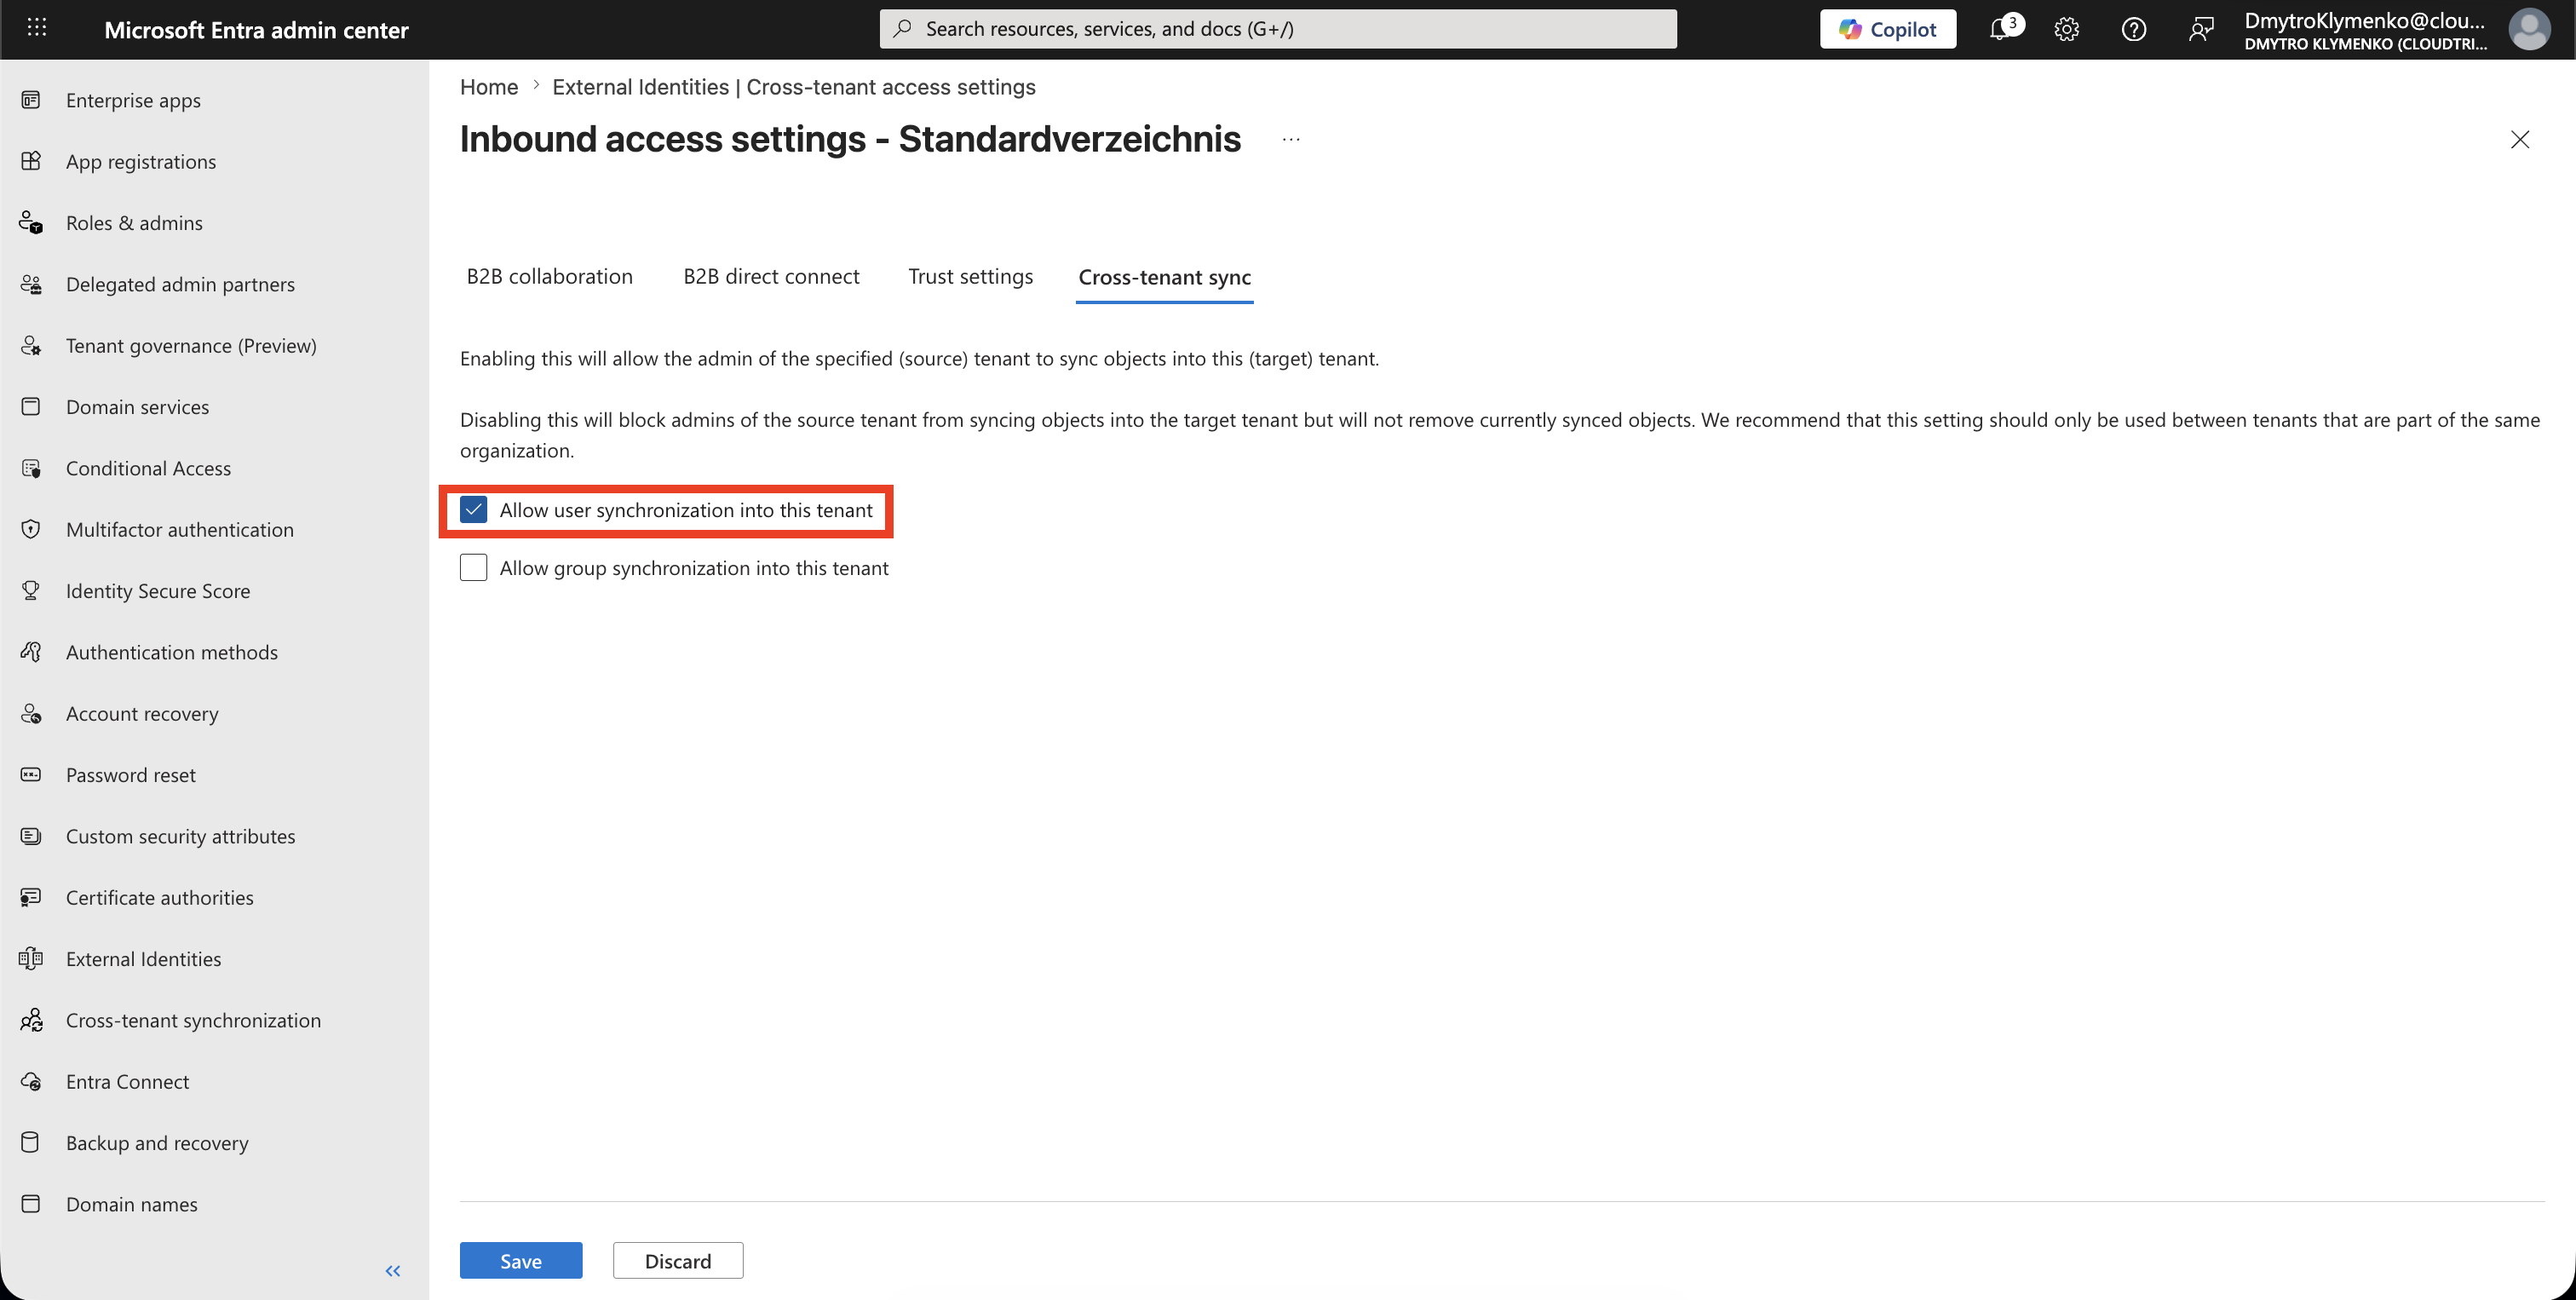
Select Save.
If the portal asks whether to enable cross-tenant sync and automatic redemption, select Yes when automatic redemption is part of your approved design.
Target Tenant: Enable Automatic Redemption
Still in the target tenant’s inbound settings for the source organization, open:
Trust settingsEnable:
Automatically redeem invitations with the tenant <source tenant>This avoids requiring every synchronized user to accept an invitation or consent prompt in the target tenant.
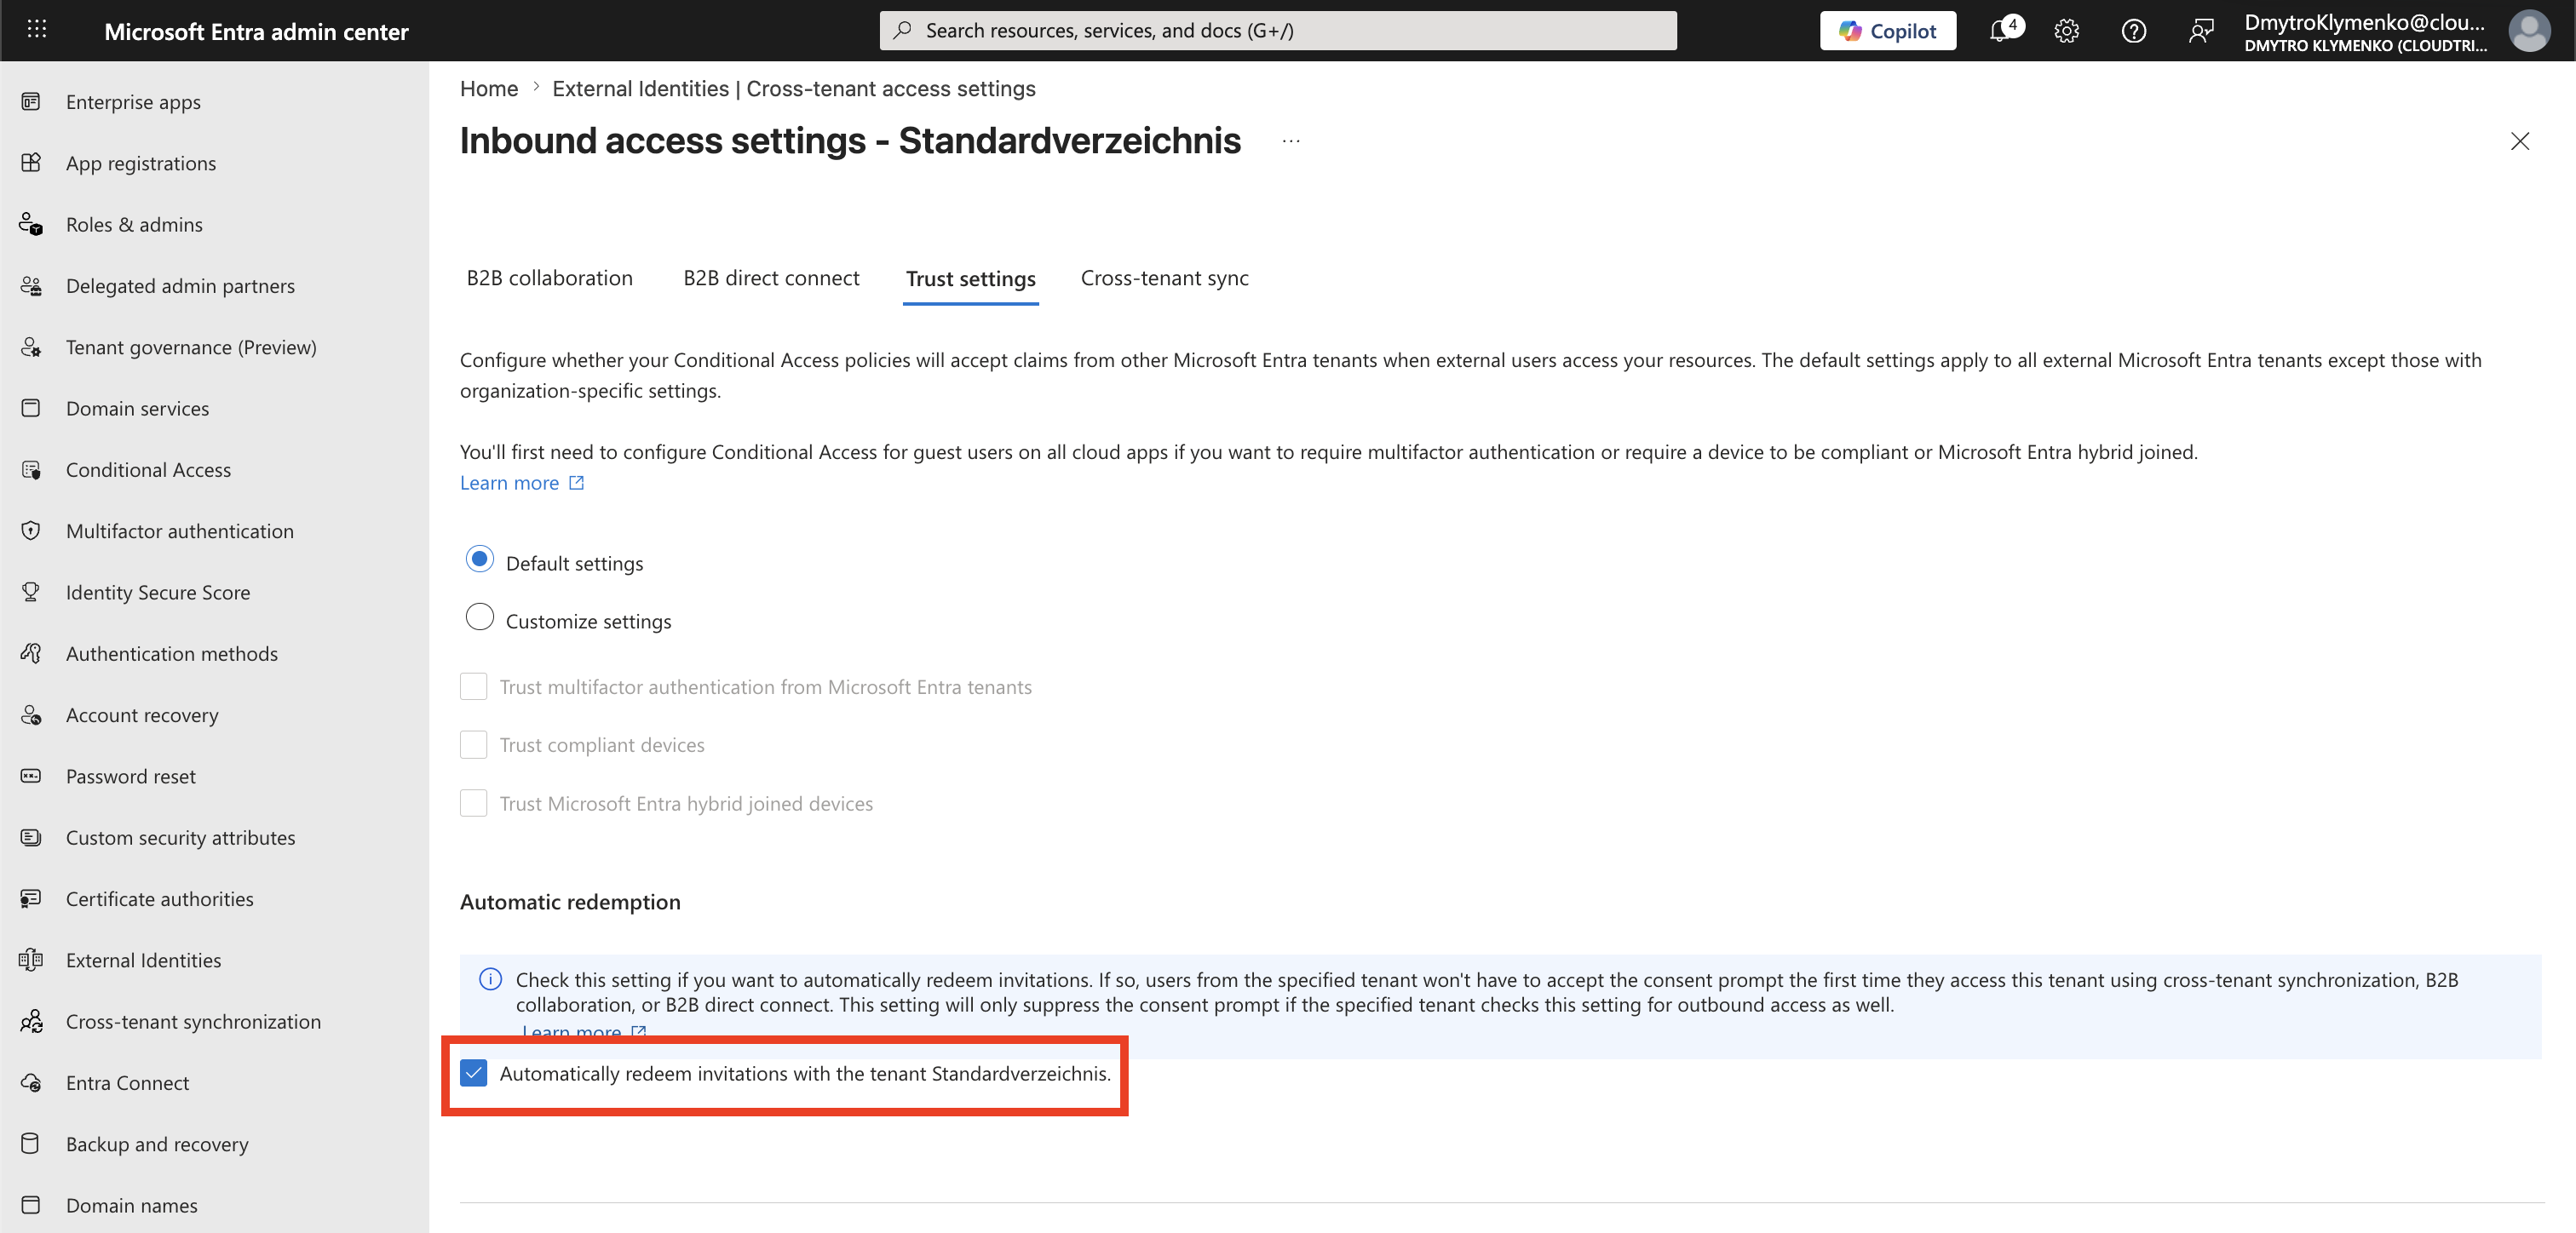
Select Save.
Automatic redemption must also be enabled on the corresponding outbound relationship in the source tenant.
Source Tenant: Add the Target Organization
Switch to the source tenant and open:
Entra ID
> External Identities
> Cross-tenant access settings
> Organizational settings
Add the target organization using its tenant ID or verified domain.
In the target organization row, open Outbound access, select Trust settings, and enable:
Automatically redeem invitations with the tenant <target tenant>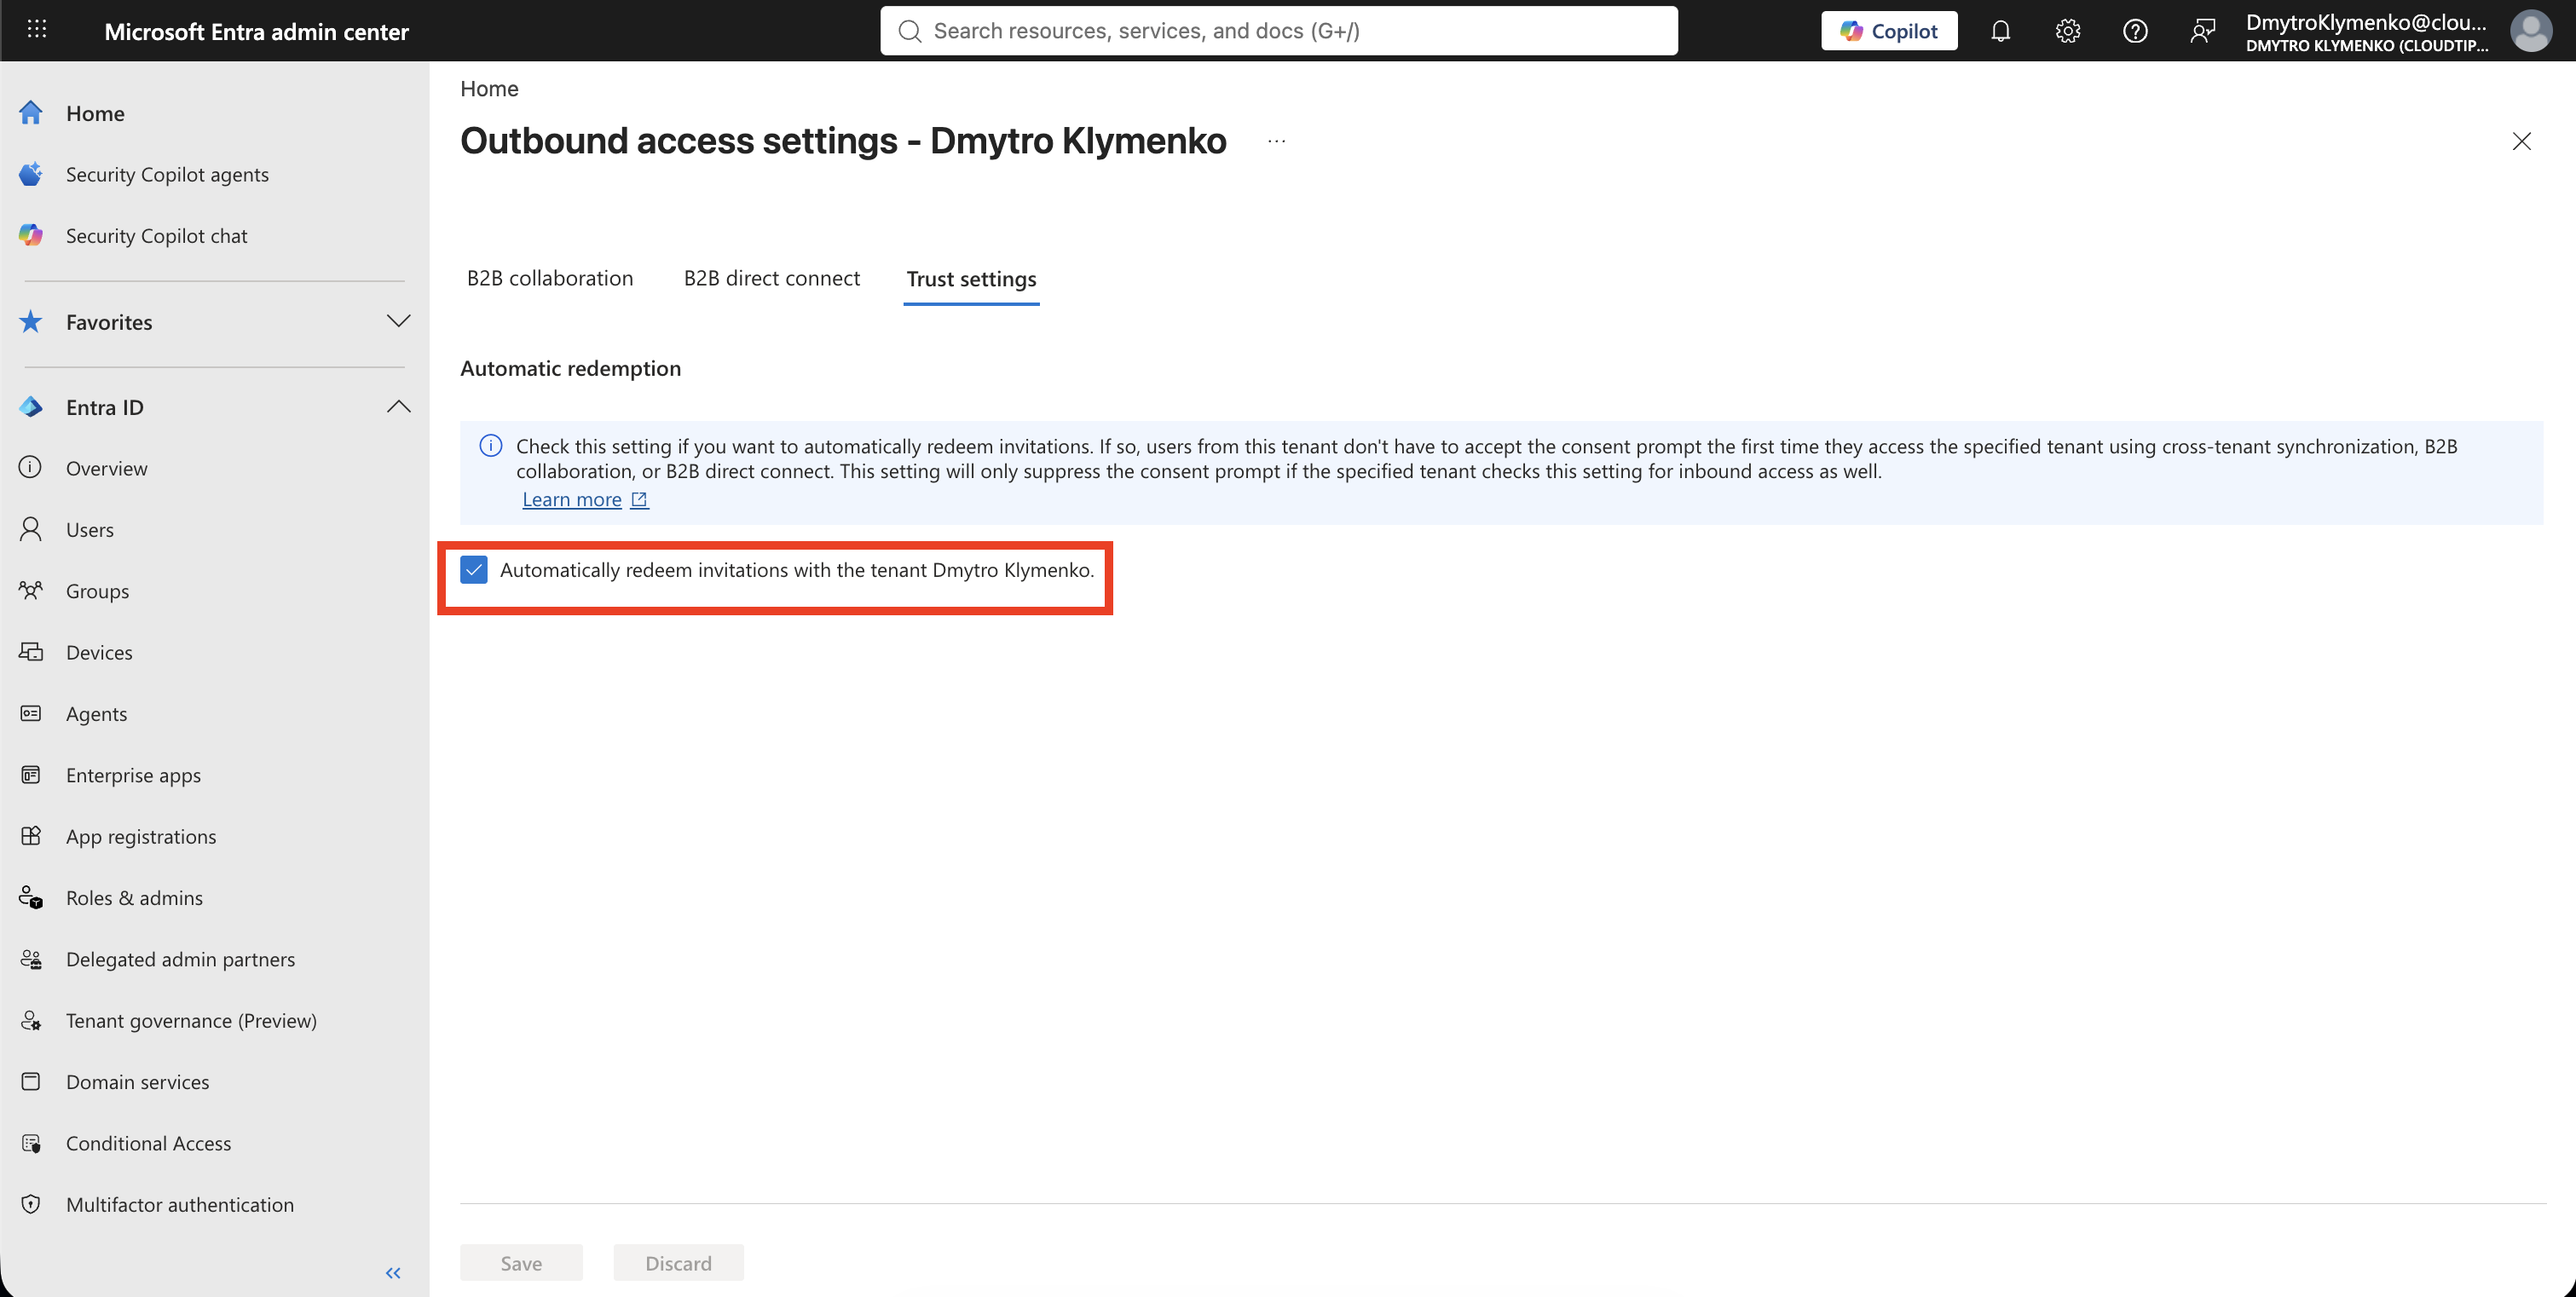
Select Save.
Source Tenant: Create the Synchronization Configuration
In the source tenant, go to:
Entra ID
> Cross-tenant synchronization
> Configurations
Select:
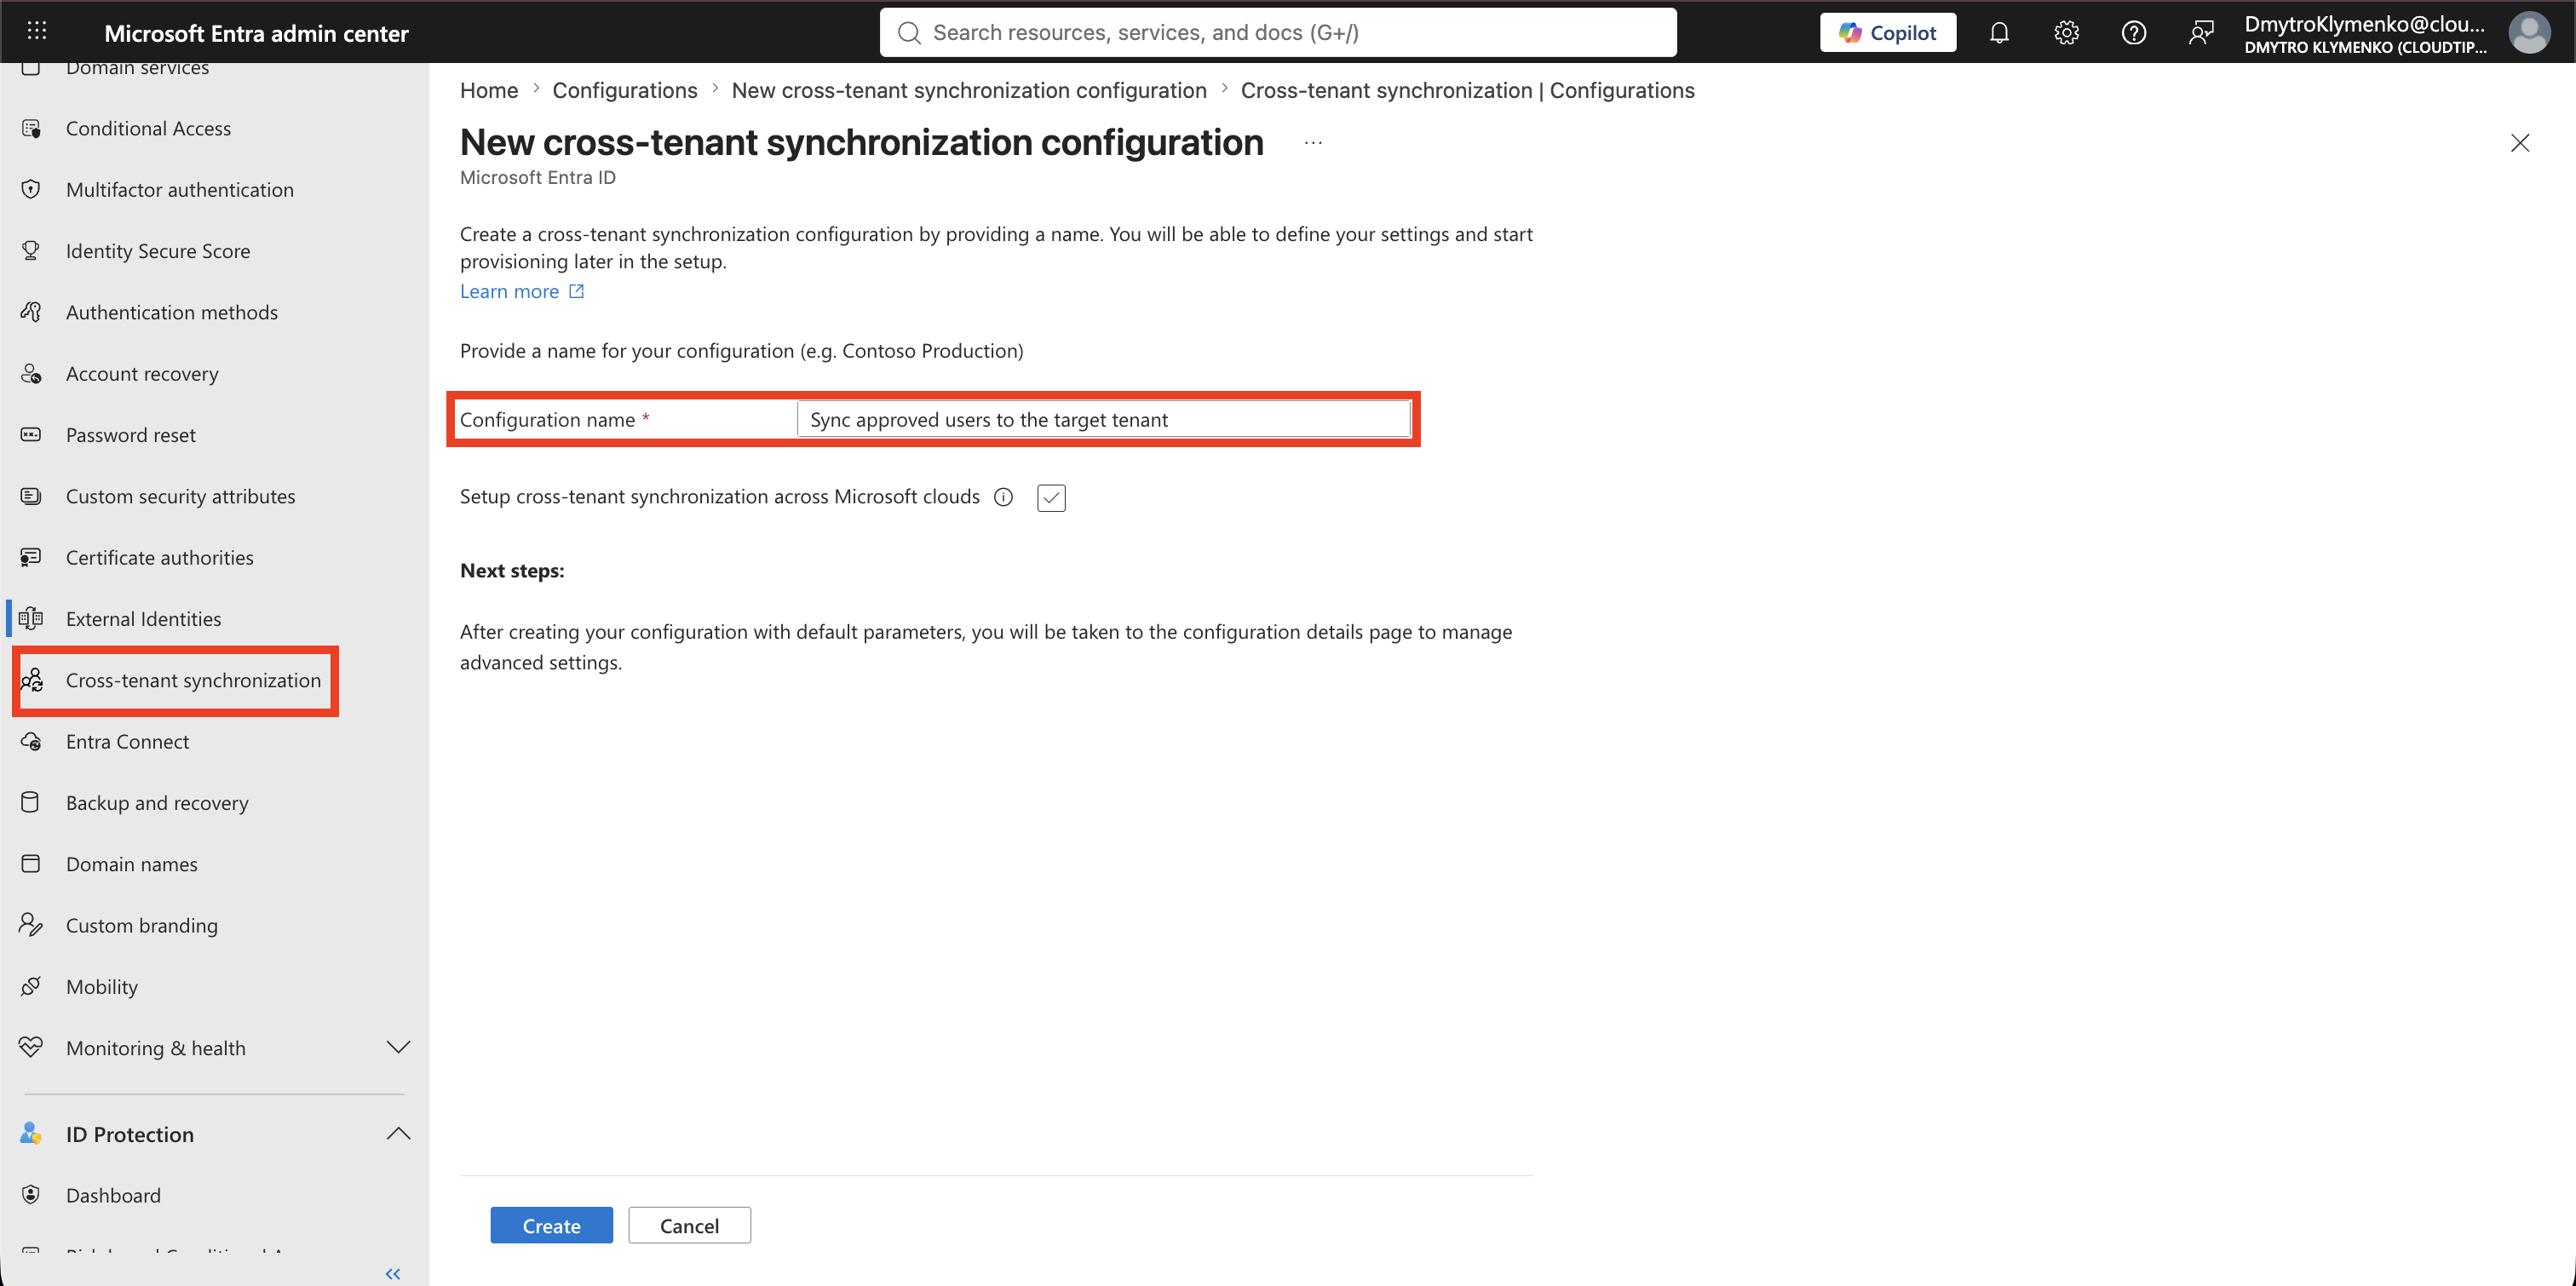
New configurationYou can also use the search box at the top of the Microsoft Entra admin center. Search for Cross-tenant synchronization configuration and open the matching result, then select Configurations.
Enter a descriptive name such as:
Sync approved users to the target tenantThen select Create.
Connect the Target Tenant
Open the new configuration and select Get started.
Configure:
Provisioning mode: Automatic
Authentication method: Cross Tenant Synchronization Policy
Tenant ID: <target tenant ID>
Select Test Connection.
The connection should report that the supplied credentials are authorized to enable provisioning. This checks the cross-tenant policies; it does not provision a user.
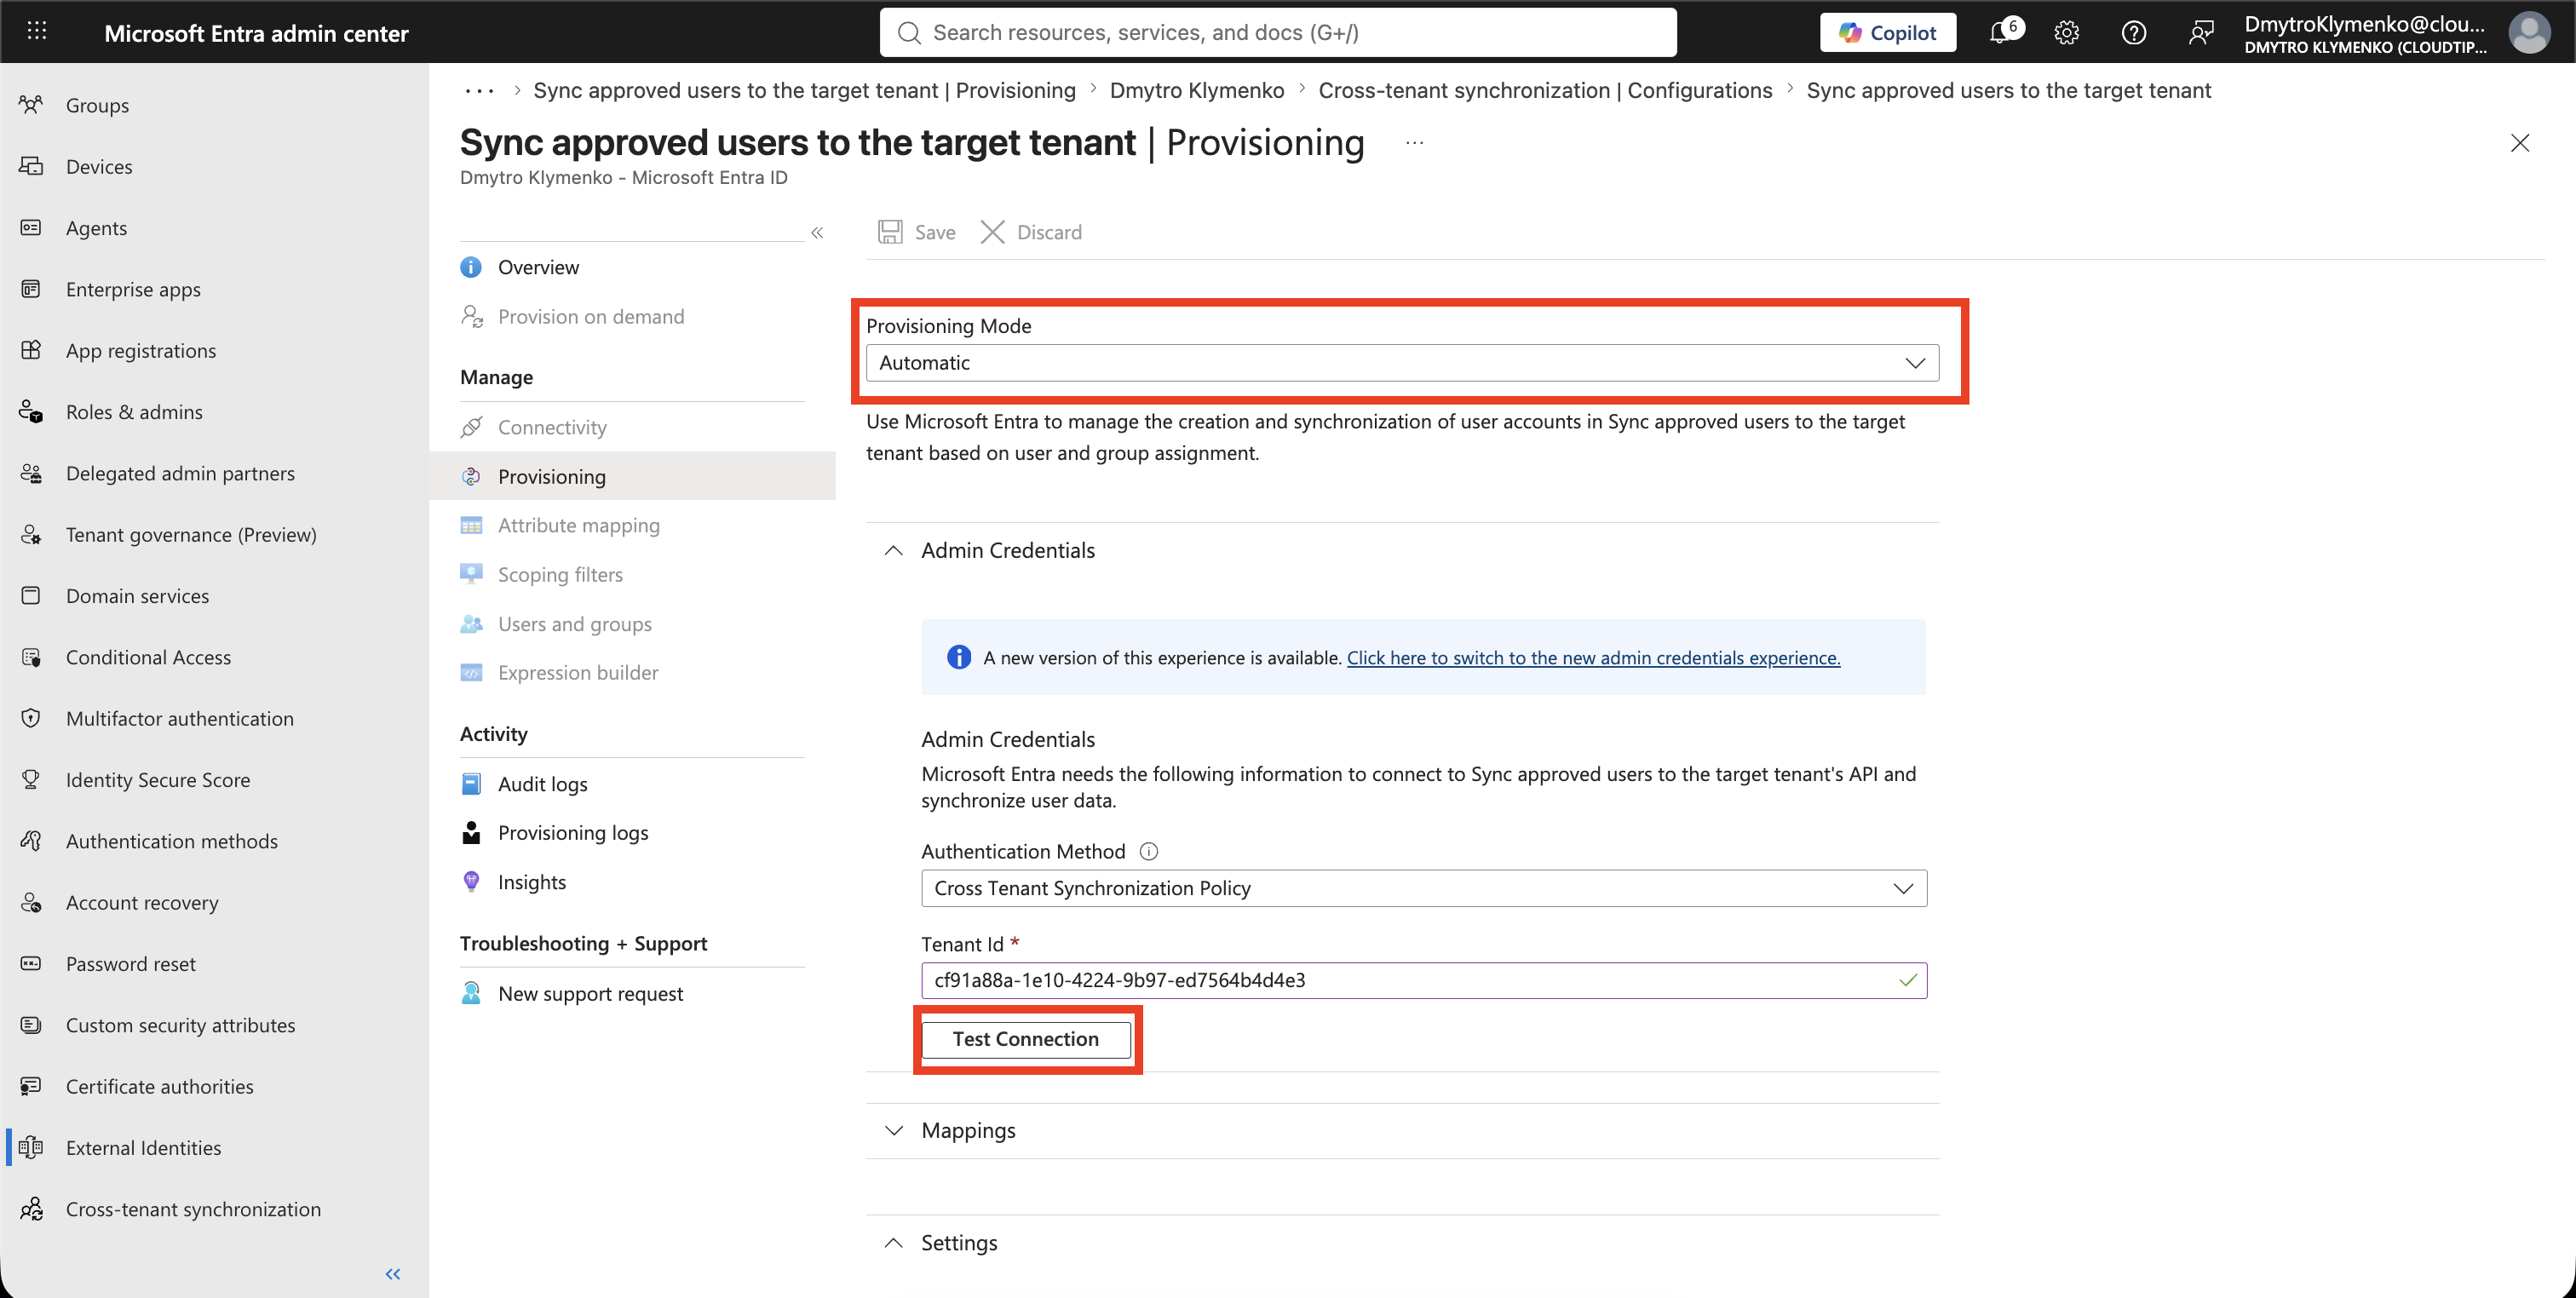
Select Save so the Mappings and Settings sections become available.
Limit the Provisioning Scope
Open Provisioning, expand Settings, and configure:
Scope: Sync only assigned users and groupsThis is safer than synchronizing all source users.
Return to the configuration and open:
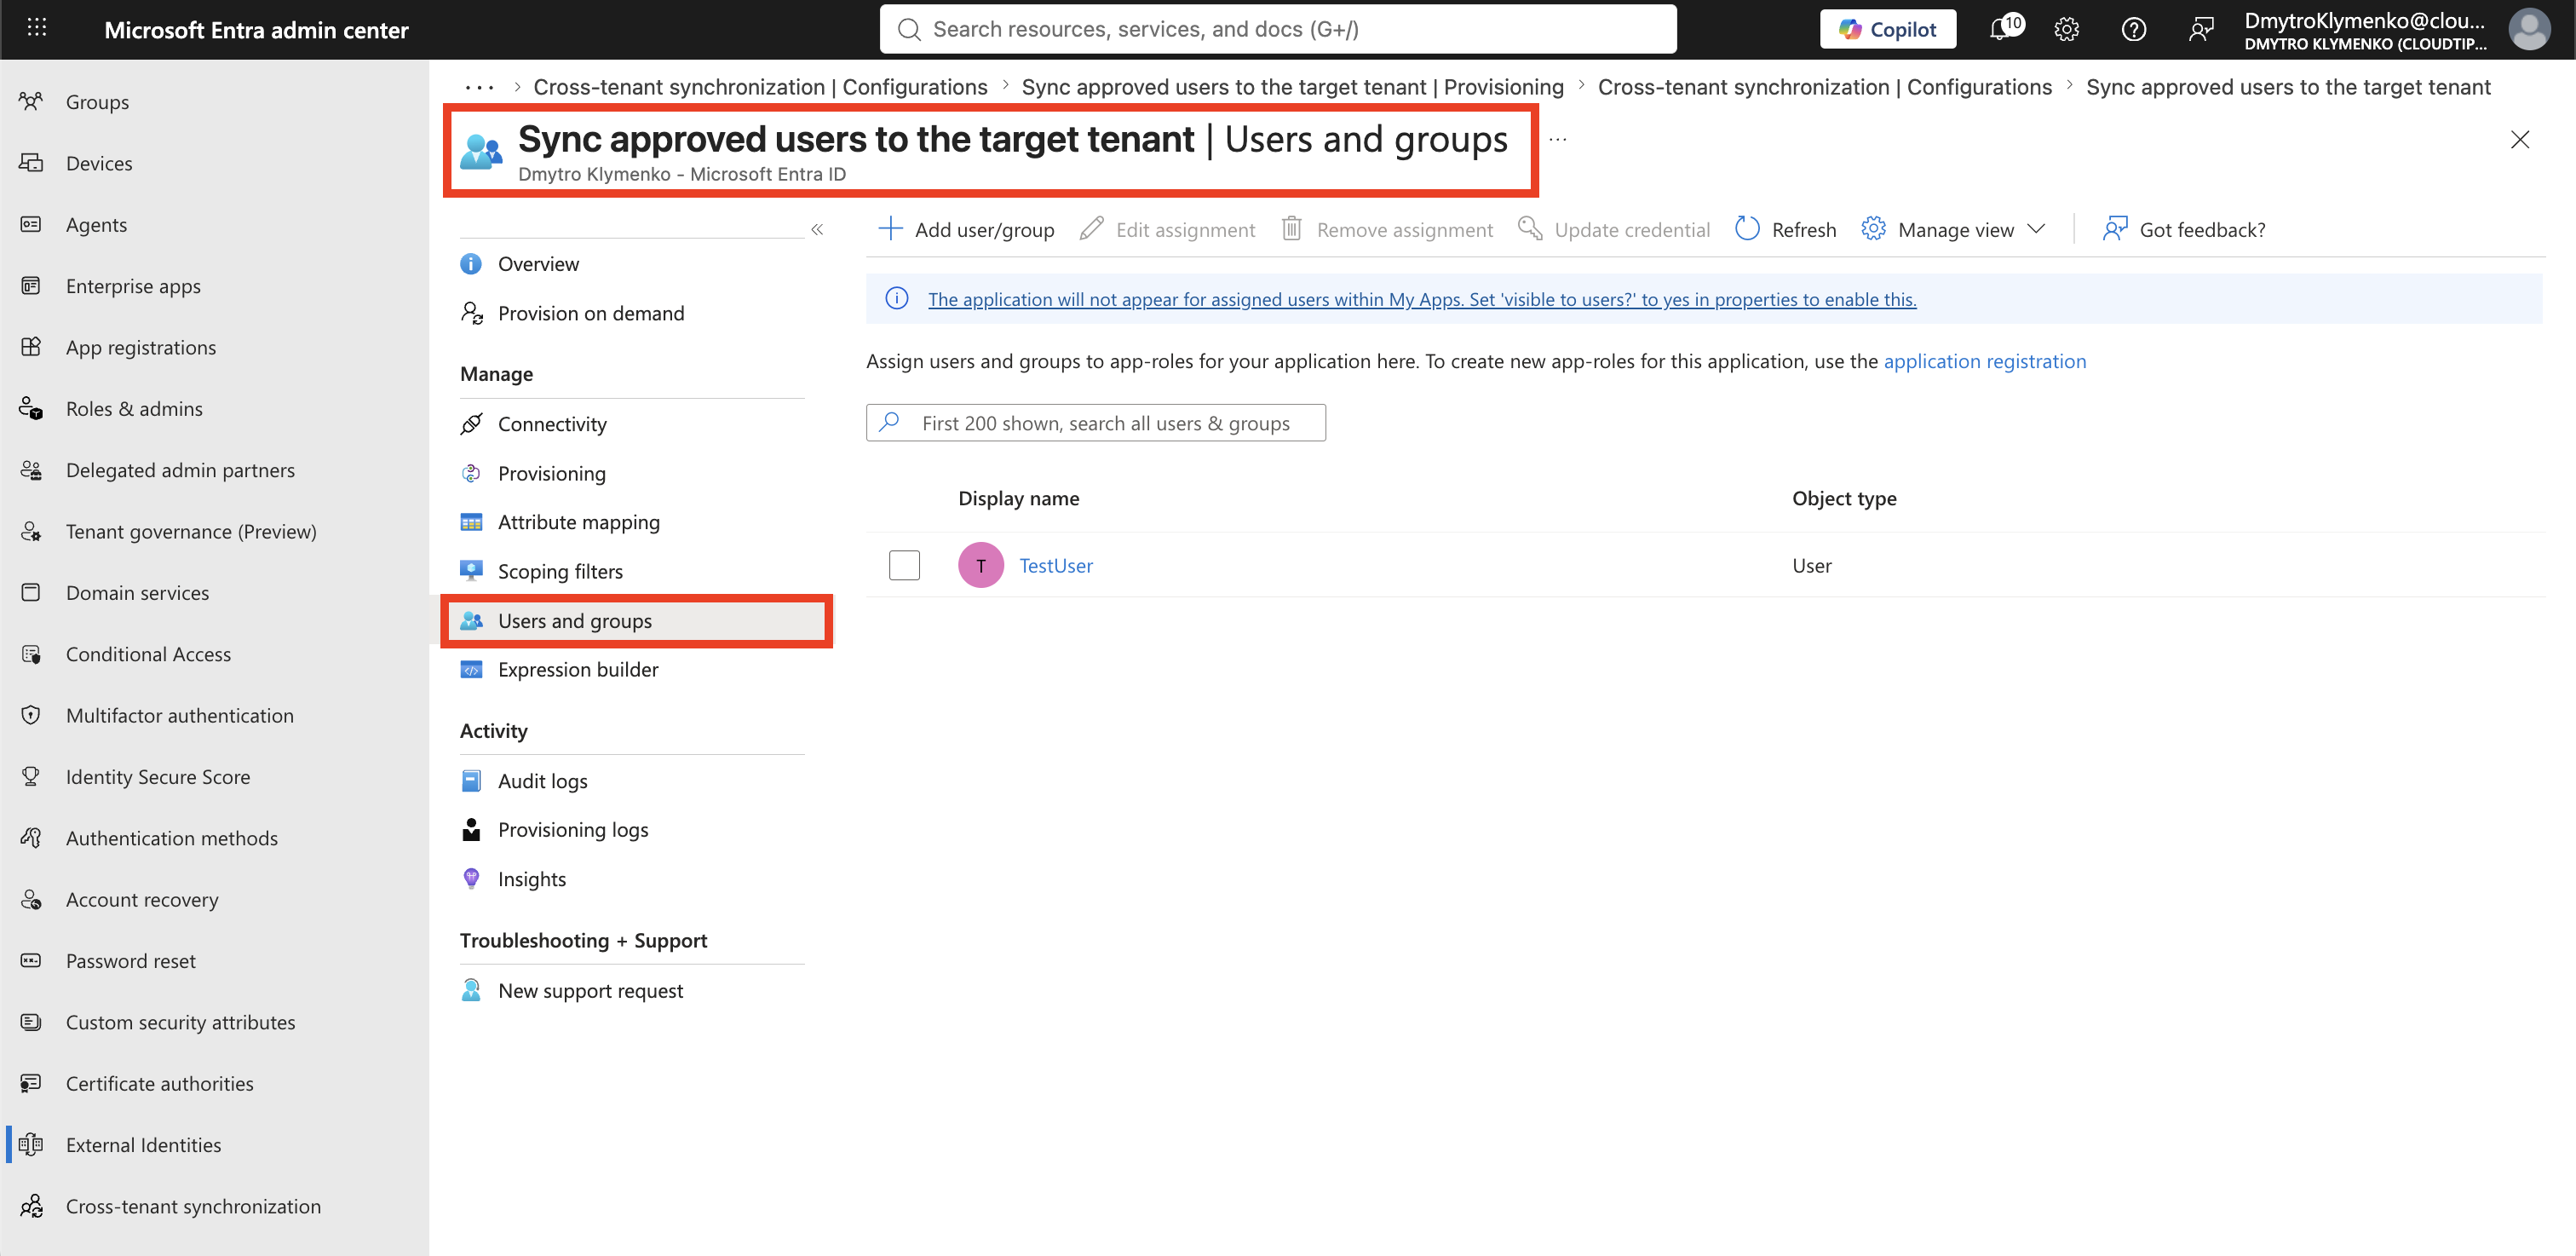
Users and groups > Add user/groupAssign only the internal users or groups that should be provisioned. When a group is assigned, only direct members are in scope; nested group membership does not cascade.
Review Attribute Mappings
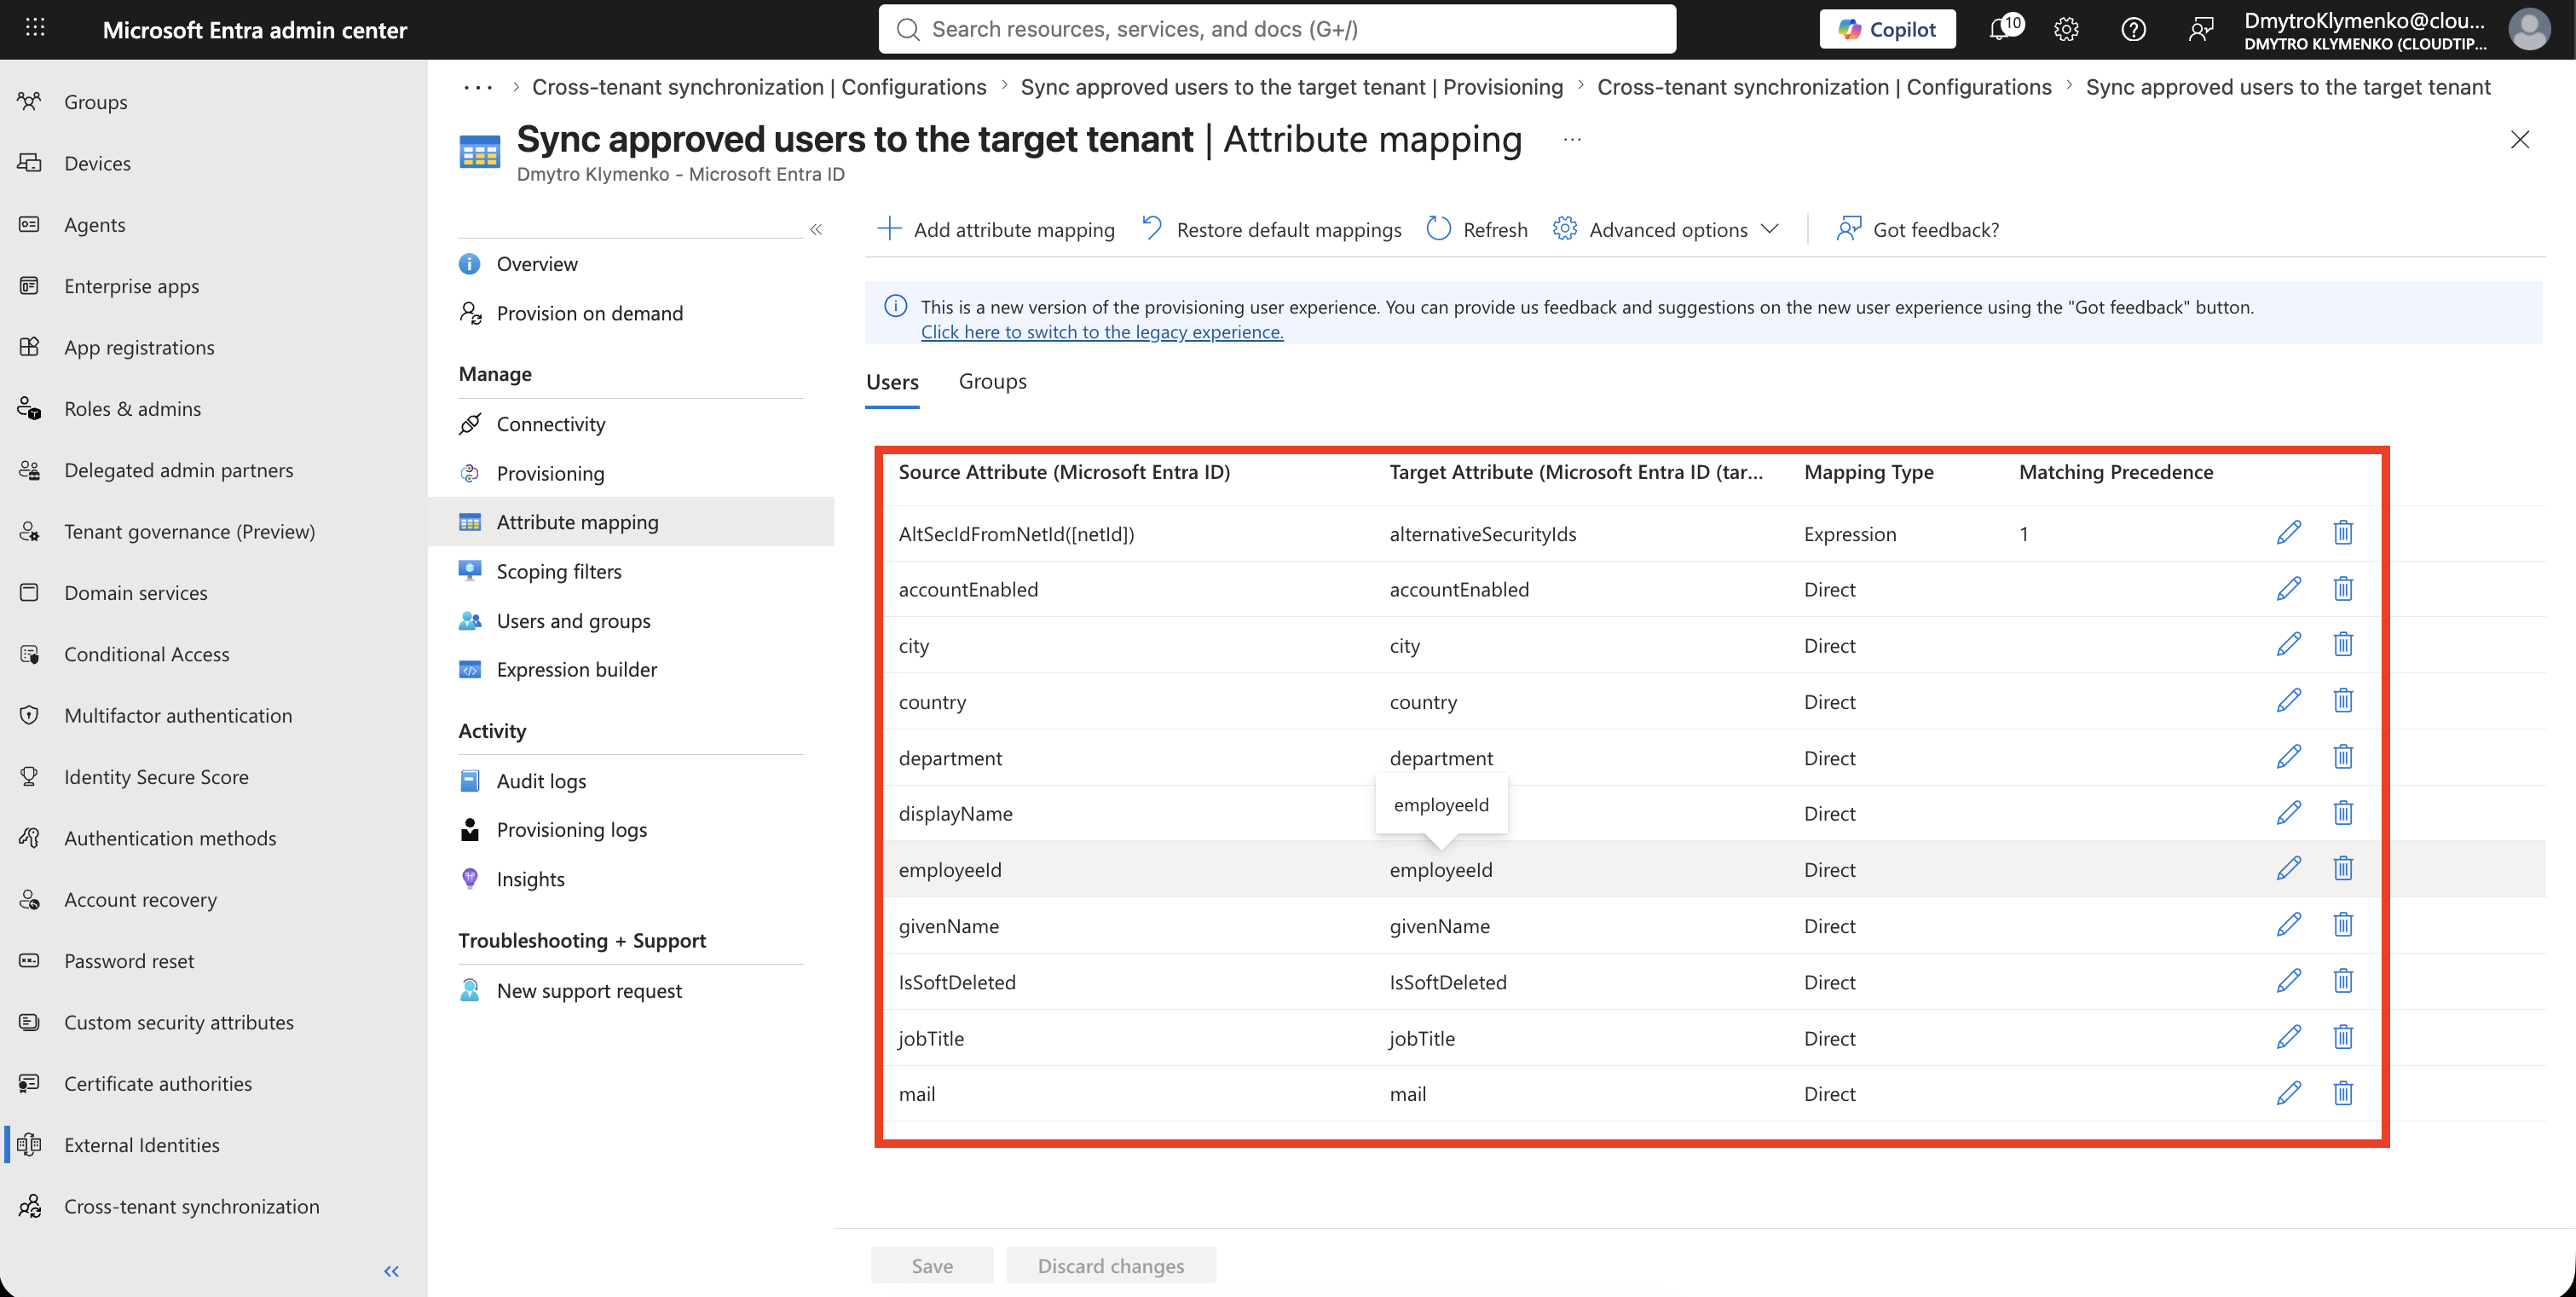
Under Provisioning, expand Mappings and open:
Provision Microsoft Entra ID UsersReview the source and target attributes before starting the job.
Important examples include:
displayName
userPrincipalName
mail
userType
showInAddressList
Keep the default mappings unless there is a documented business requirement to change them. An incorrect transformation can affect every synchronized identity.
If existing manually invited guests must be matched, review the matching behavior and pending invitation state before rollout.
Select Save after any approved mapping changes.
Configure Provisioning Safety Settings
Under Provisioning > Settings, configure an error-notification email.
Enable accidental deletion prevention and choose a threshold appropriate for the synchronized population.
Example:
Send an email notification when a failure occurs: Yes
Prevent accidental deletion: Yes
Deletion threshold: 10
The threshold should be deliberately lower than the default when only a small partner population is synchronized.
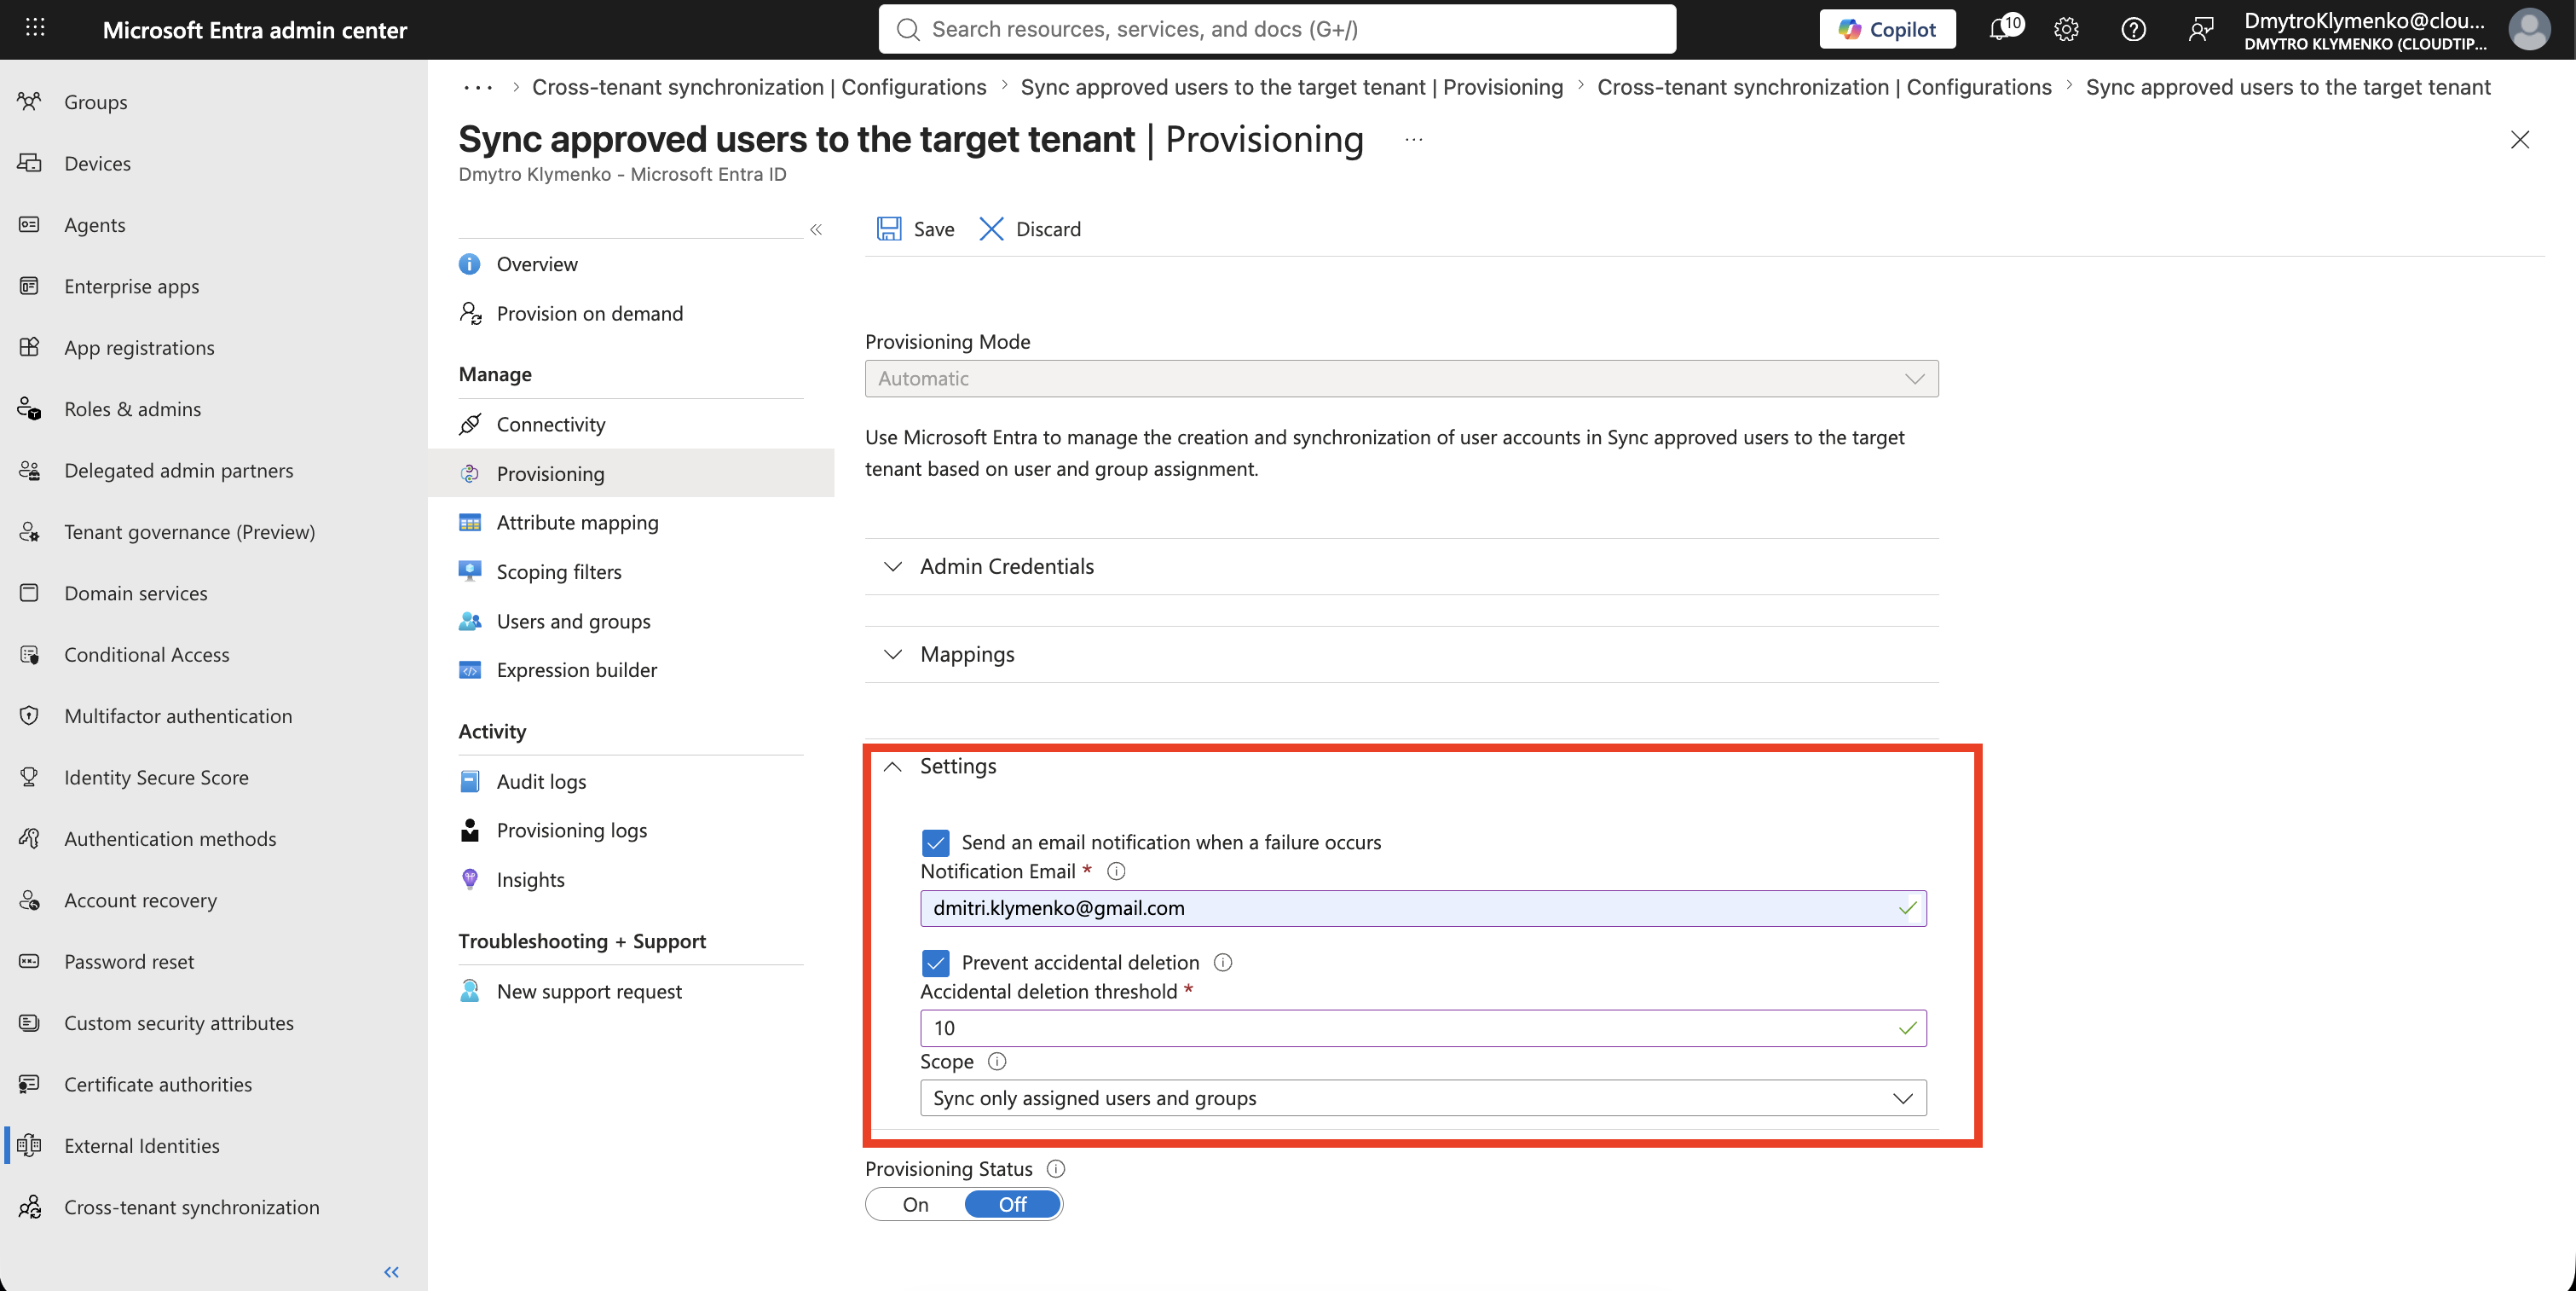
Select Save.
Start and Monitor Provisioning
Tip: For the initial test, assign and provision only
TestUser. UseProvision on demandto verify that this user is created successfully in the target tenant before starting provisioning for the full assigned scope.
Open the configuration overview and select:
Start provisioningThe initial cycle takes longer than later incremental cycles.
Use Provisioning logs to review created, updated, skipped, failed, and deprovisioned objects.
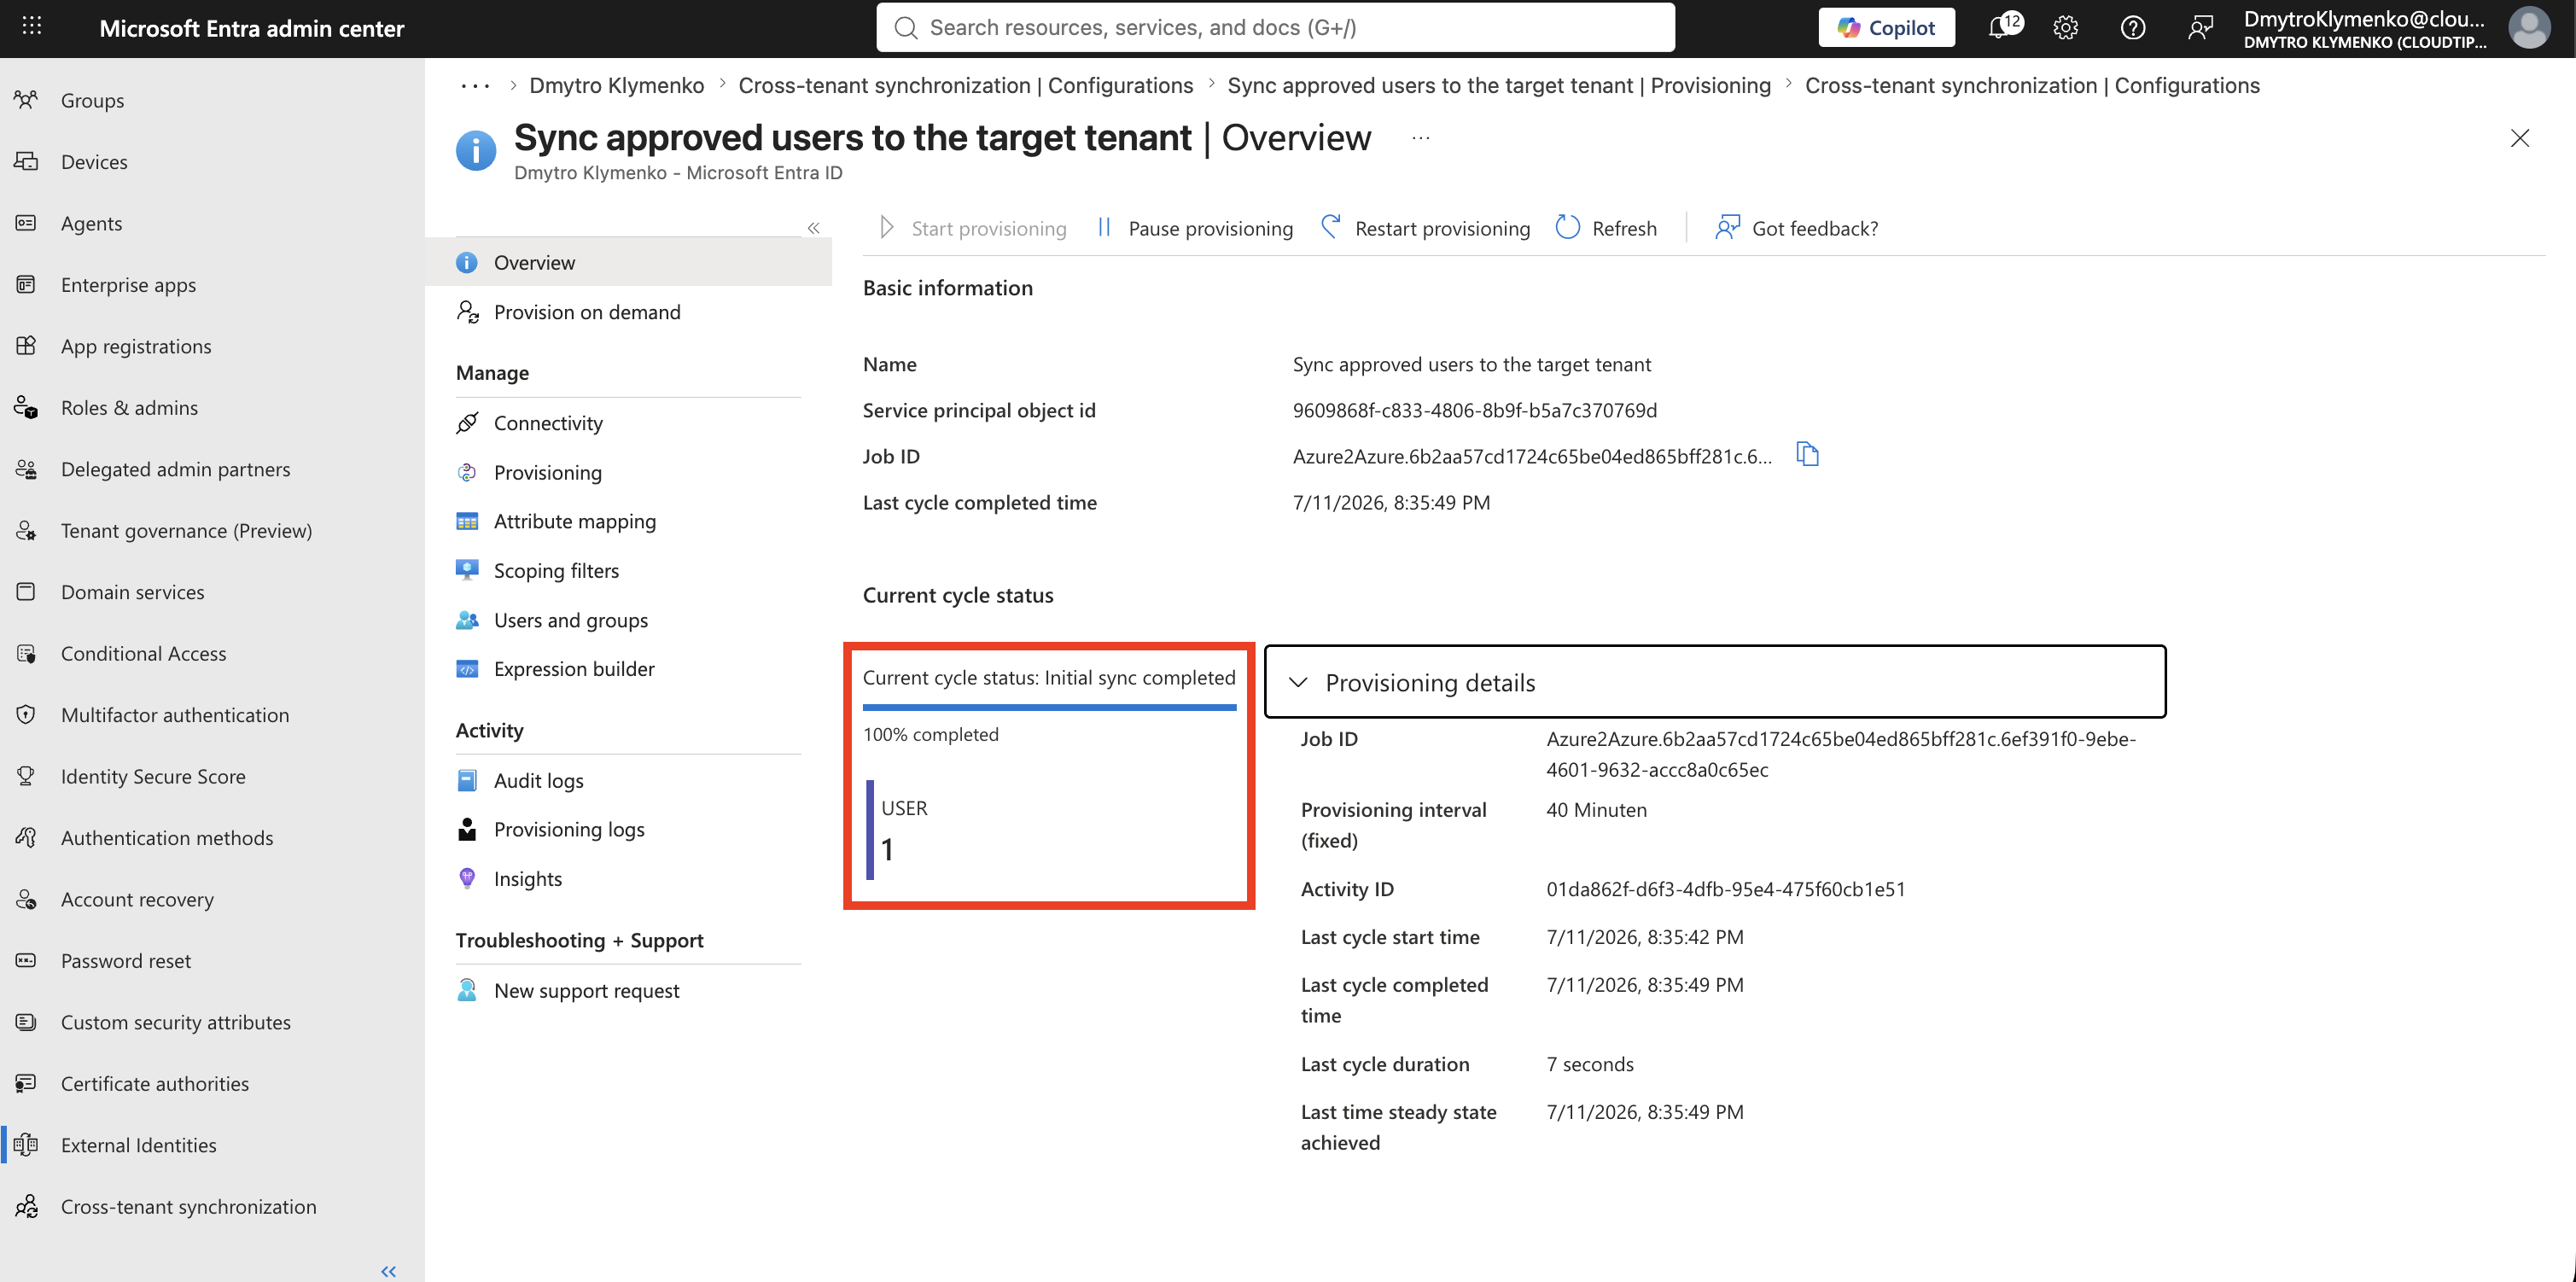
In the target tenant, synchronized identities appear as B2B collaboration users. Assign them to the resources they need; synchronization alone does not provide application or Azure access.
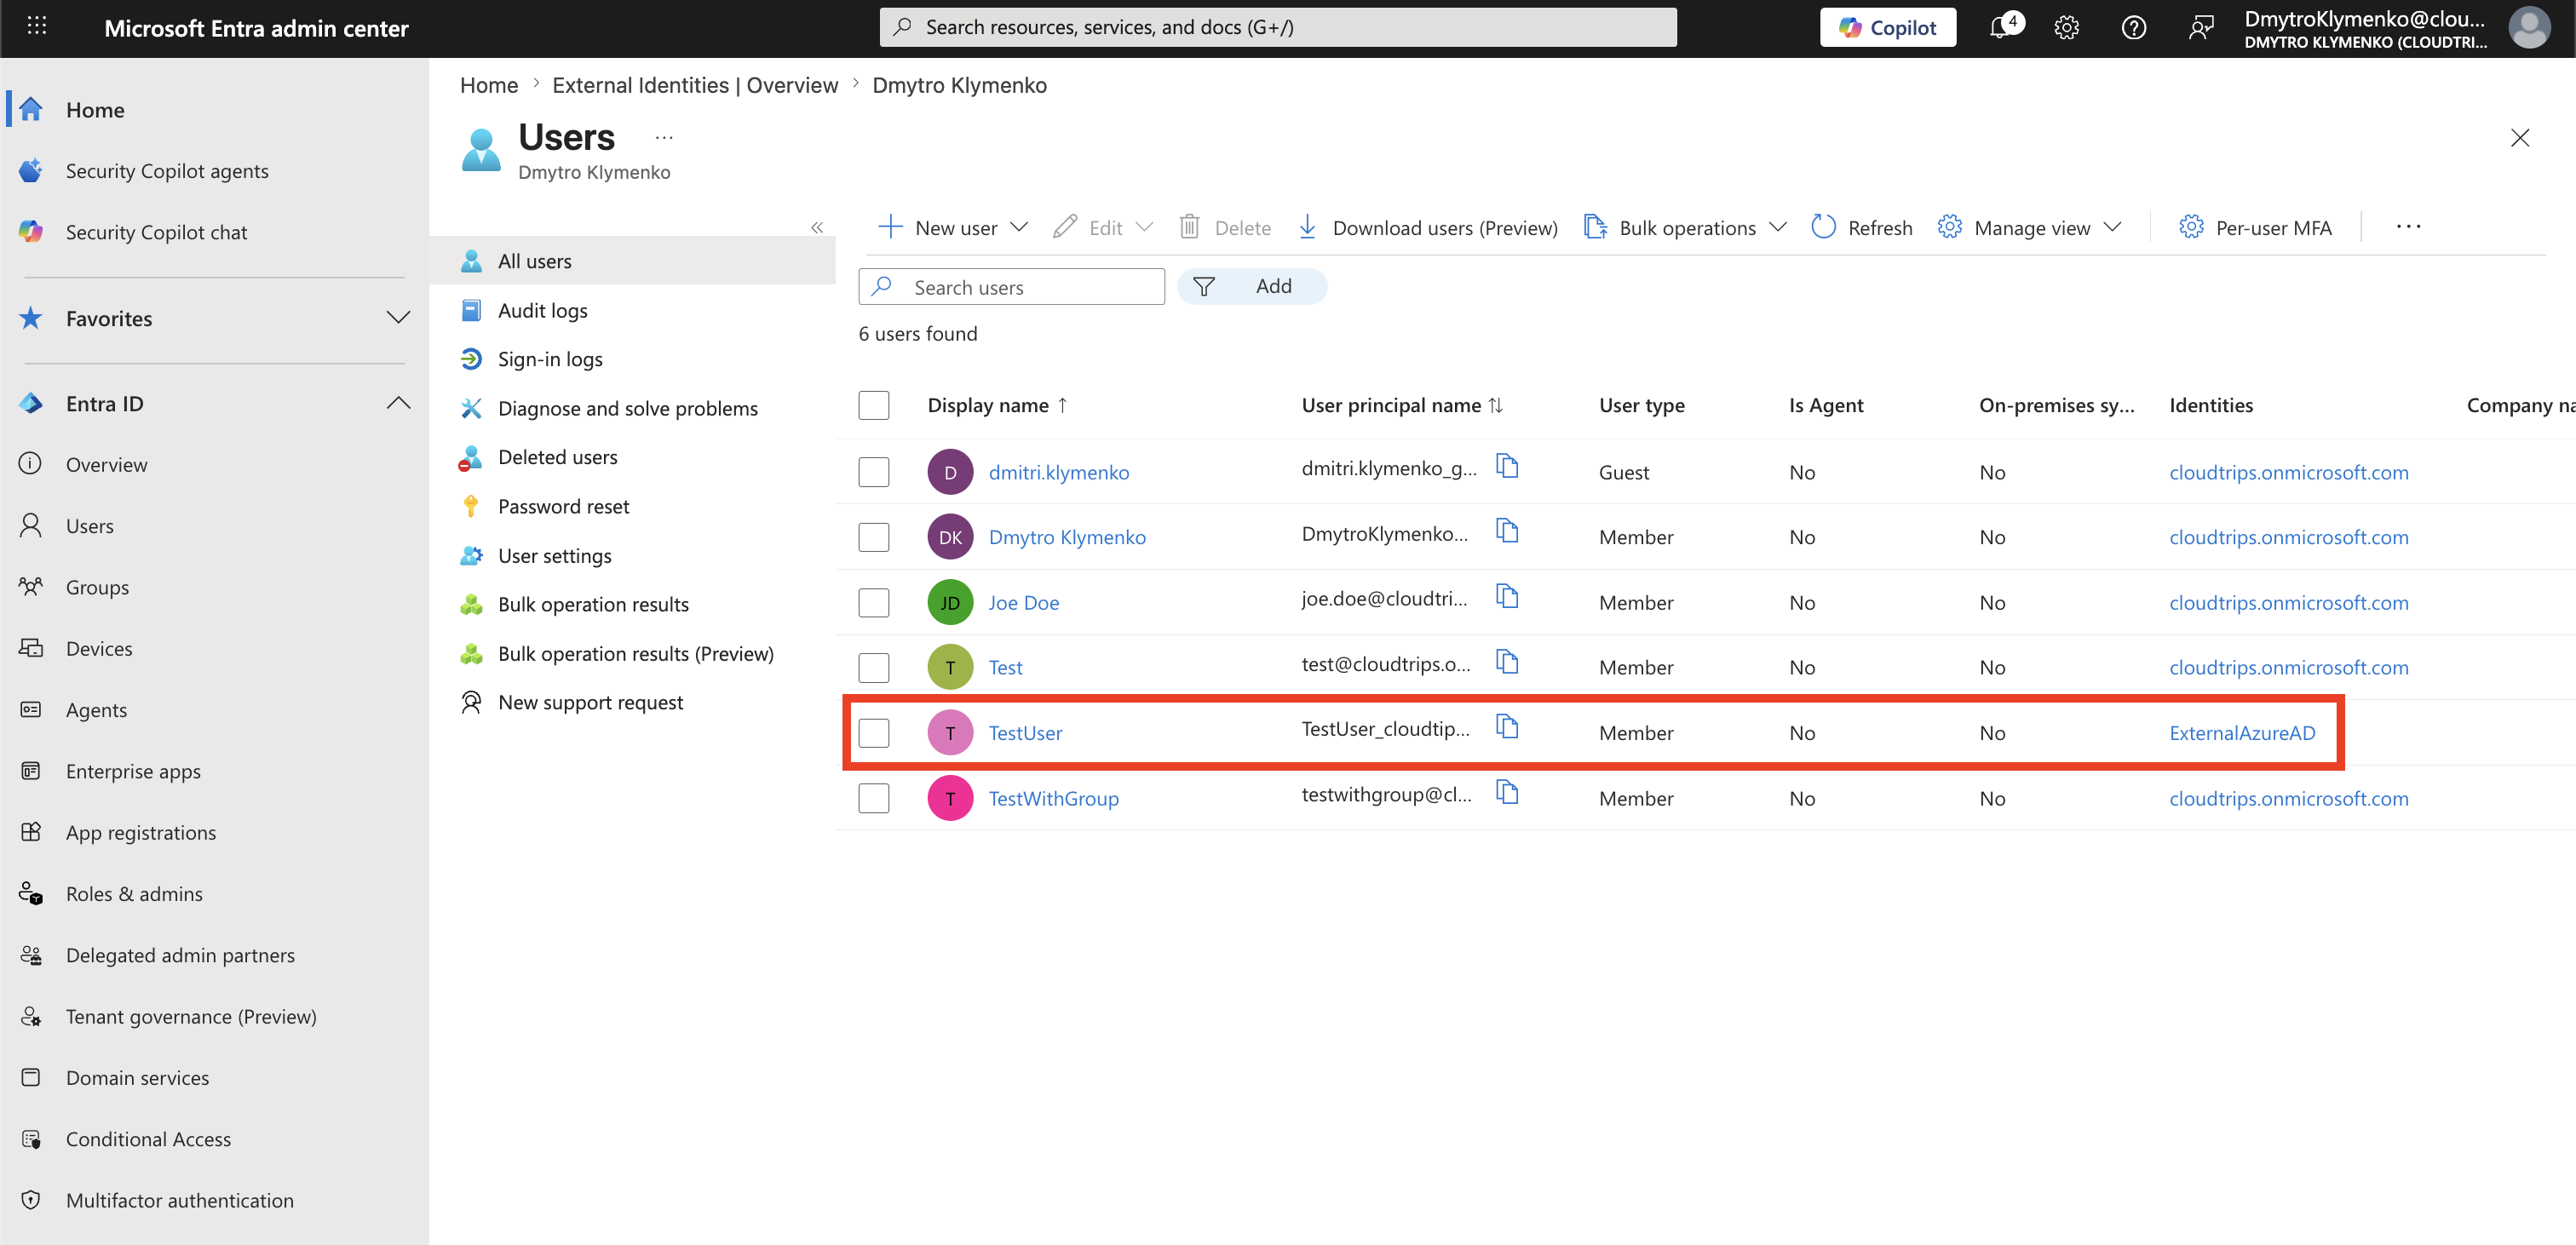
Verify the result in the target tenant:
Entra ID
> Users
> All users
Confirm that TestUser appears in the list as a synchronized B2B collaboration user.
Lifecycle Behavior
Cross-tenant synchronization continuously evaluates the configured scope.
Source user added to scope -> target B2B user is created
Source attributes change -> mapped target attributes are updated
Source user removed from scope or deleted -> target B2B user is deprovisioned according to the provisioning settings
Do not treat the target object as an independently managed employee account. The source tenant remains authoritative.
Enterprise Note
Recommended checklist:
- use cross-tenant synchronization mainly for tenants within the same organization
- complete privacy and compliance review for cross-organization synchronization
- synchronize only approved users or groups
- keep application and Azure assignments separate and least privileged
- review mappings before starting provisioning
- configure accidental-deletion protection
- send failure notifications to a monitored mailbox
- monitor provisioning logs and quarantine state
- document which tenant is authoritative
- define how synchronized users lose resource access when they leave scope
Cross-tenant synchronization automates the B2B identity lifecycle. It does not replace application authorization, Conditional Access, access reviews, or data-governance controls.