Encrypted Traffic Needs Inspection? Configure Firewall Premium TLS Inspection
The CloudTrips firewall can allow or deny an HTTPS destination by domain name, but the application data inside the connection is encrypted. Standard firewall filtering cannot inspect that encrypted content for threats.
Use Transport Layer Security (TLS) inspection in Azure Firewall Premium. The firewall establishes one encrypted connection with the workload and a second encrypted connection with the destination website. Between those connections it can inspect the decrypted traffic and then encrypt it again.
VM -> encrypted TLS -> Azure Firewall
                        inspect
Azure Firewall -> encrypted TLS -> Website
In this lab, the VM sends an HTTPS request to www.microsoft.com. Without TLS
inspection, Microsoft sends its website certificate directly to the VM. The VM
checks that certificate to confirm that it is communicating securely with the
real Microsoft website. TLS inspection places the firewall between them, so
the VM now receives a temporary certificate for www.microsoft.com that was
created and signed by the firewall instead.
The VM will reject that certificate unless it trusts the Certificate Authority (CA) that signed it. A CA is the trusted certificate issuer. For this lab, the firewall uses its own CA, and we will install that CA’s public certificate on the VM. This tells the VM that certificates created by the CloudTrips firewall are trusted during inspection.
This trip builds on Inbound Firewall Publishing Needed? Configure Firewall DNAT. Keep the existing firewall, policy, route, private VM, and public IP. The DNAT rule is not used by this outbound test, but keep it for the following IDPS trip.
Azure Firewall Premium costs more than Standard. Complete this trip and the following IDPS trip in the same lab session when possible.
Understand the Lab Certificate
In production, a company normally uses its own managed certificate system, called a Public Key Infrastructure (PKI). It provides two different things:
- The firewall receives an intermediate CA certificate and its private key. This gives the firewall permission to sign temporary website certificates.
- Company devices receive only the public root CA certificate, usually through centralized device management. They use it to verify that the firewall’s temporary certificates were signed by a trusted company CA.
The devices never receive the CA private key. They only receive the public certificate needed for verification.
This TEST lab uses Azure Firewall Premium certificate auto-generation. The Premium Firewall Policy is the configuration attached to the Premium firewall. It stores the firewall rules and Premium settings, including TLS inspection. It is an Azure Firewall Policy resource, not the Azure Policy service used for governance.
Azure creates three supporting resources and connects them to this Firewall Policy:
User-assigned managed identity
Key Vault
Self-signed CA certificate
The managed identity lets the policy read the CA certificate from Key Vault. Only the public certificate will be installed on the VM. Do not export or distribute the CA private key. Auto-generated certificates are appropriate for this lab, not for production.
Upgrade the Firewall and Policy
Open afw-cloudtrips-test-weu. On Overview, select Change SKU.
Configure:
Target SKU: Premium
Policy option: Upgrade or duplicate the current Standard policy to Premium
Use the existing Standard policy as the source so Azure carries forward
Allow-Approved-Web and Publish-CloudTrips-HTTP. Do not attach an empty
Premium policy.
Select Save and wait until the firewall provisioning state is Succeeded. The change normally takes several minutes. Record the name of the Premium policy now associated with the firewall.
Open that policy and confirm:
Policy tier: Premium
Allow-Approved-Web: Present
Publish-CloudTrips-HTTP: Present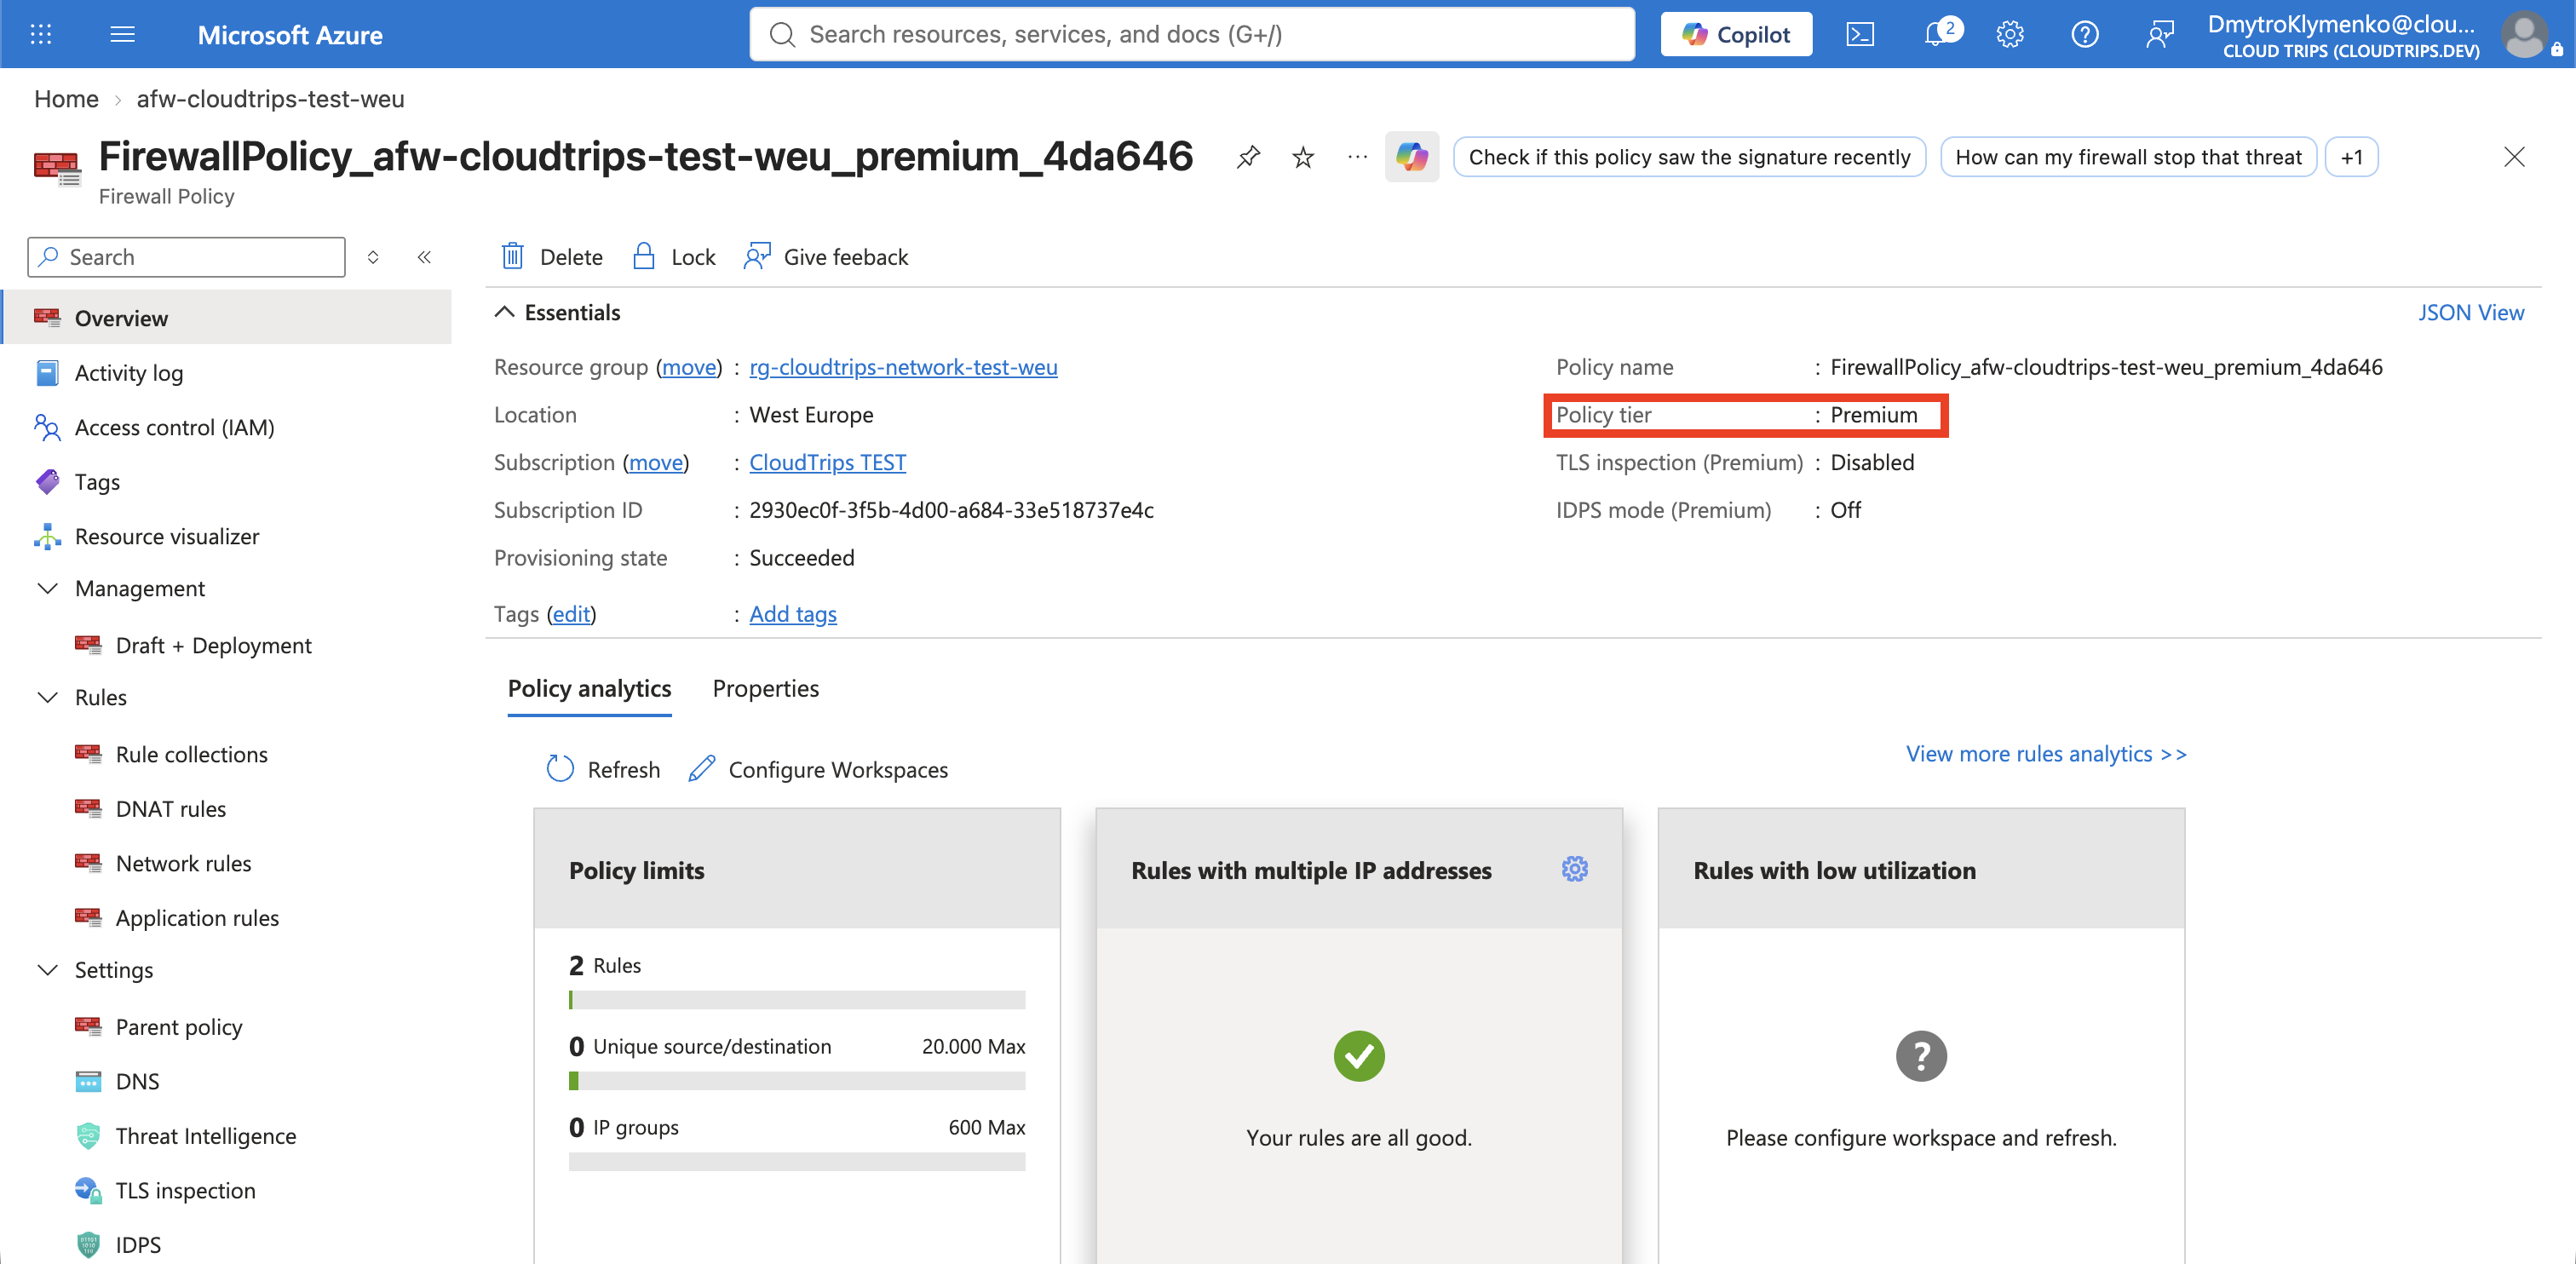
The SKU enables Premium processing capabilities. It does not inspect TLS until the policy has a CA certificate and an applicable rule enables inspection.
Auto-Generate the Lab CA
Open the Premium Firewall Policy and select Settings > TLS inspection. Select Enabled.
In the auto-generation section, choose the entries marked (New) for:
Managed identity: Create the generated fw-cert-id resource
Key vault: Create the generated fw-cert-kv resource
Certificate: Create the generated fw-cert resource
The portal adds unique suffixes to these names. Record the exact Key Vault and certificate names because the next step uses them. Select Save and wait for the policy update to finish.
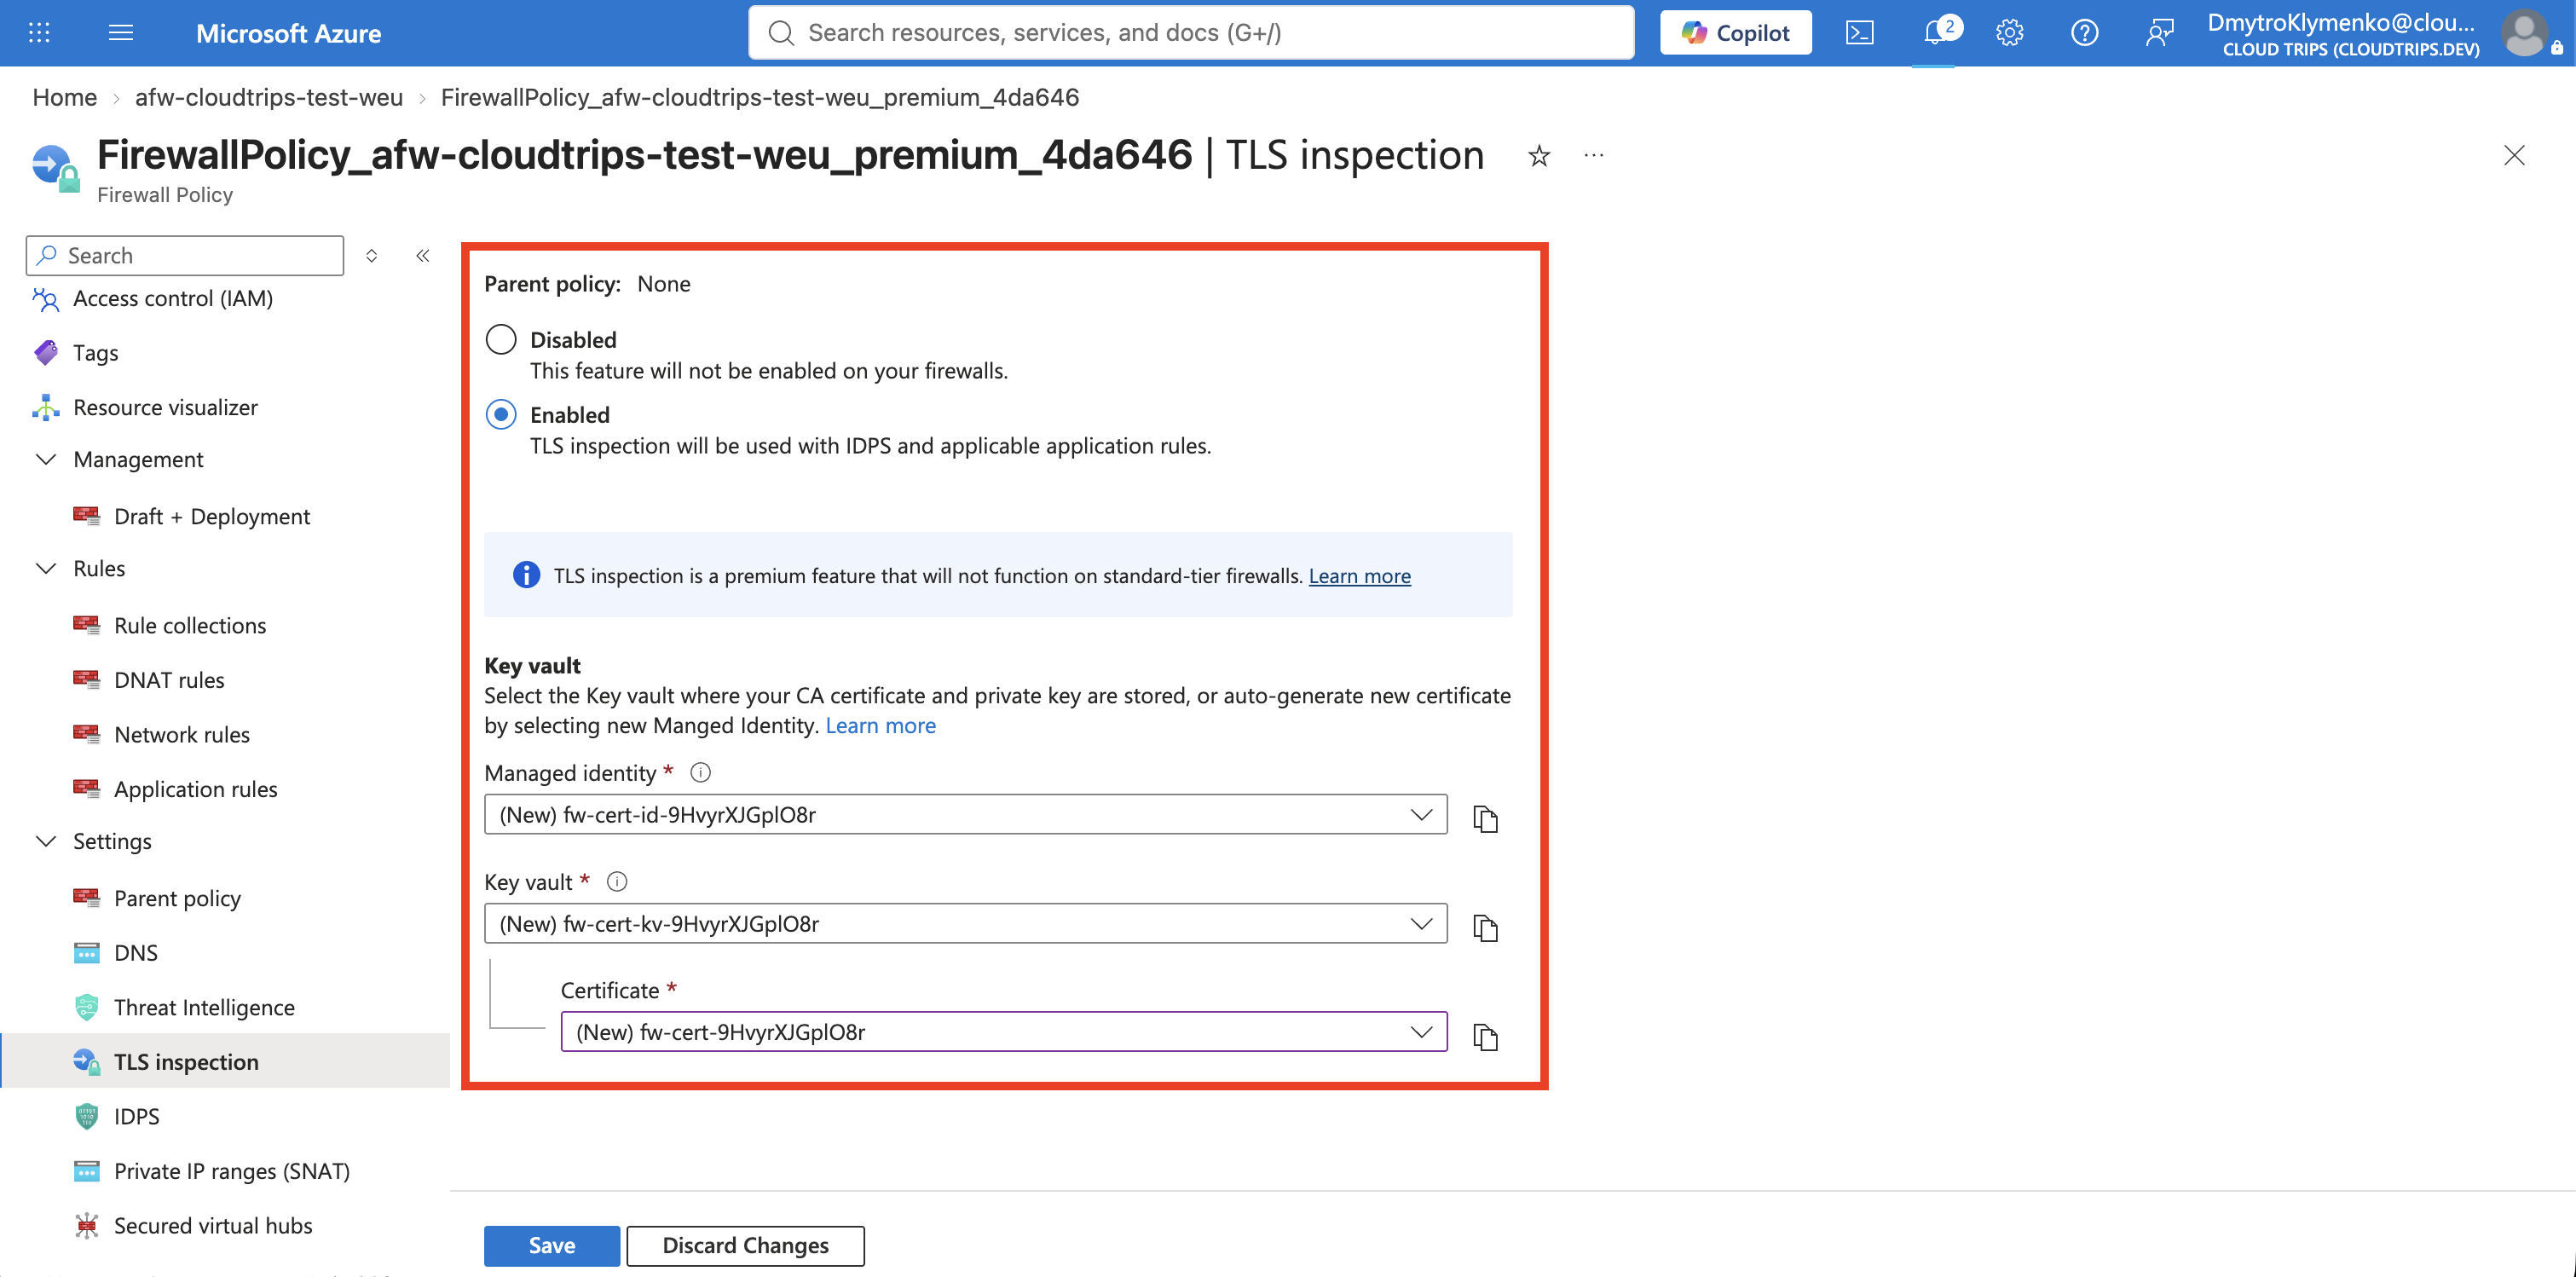
If the certificate is not selectable, open the generated Key Vault and add an access policy for your own user account with Get and List under both Certificate permissions and Secret permissions. The firewall’s managed identity also requires Get and List under Secret permissions; the auto-generation workflow normally creates that policy automatically.
Trust the Generated CA on the VM
The firewall can now create replacement certificates, but the VM does not yet trust their issuer. The following commands download the public CA certificate with Azure CLI and remotely add it to Ubuntu’s list of trusted certificate authorities. You do not need to copy the file into the VM manually.
On your Mac, open a terminal in which Azure CLI is signed in to CloudTrips TEST. Replace the two placeholders with the names recorded on the TLS
inspection page:
az keyvault certificate download \
  --vault-name <generated-key-vault-name> \
  --name <generated-certificate-name> \
  --file /tmp/cloudtrips-firewall-root.pem \
  --encoding PEM
The downloaded file contains the public certificate, not the private key. Check it:
openssl x509 \
  -in /tmp/cloudtrips-firewall-root.pem \
  -noout \
  -subject \
  -issuer
Encode the public certificate so Azure VM Run Command can transfer it safely as text:
CLOUDTRIPS_CA_BASE64=$(base64 < /tmp/cloudtrips-firewall-root.pem | tr -d '\n')Install it on the test VM:
az vm run-command invoke \
  --resource-group rg-cloudtrips-network-test-weu \
  --name vm-cloudtrips-bastion-test-weu \
  --command-id RunShellScript \
  --scripts "echo '$CLOUDTRIPS_CA_BASE64' | base64 --decode | sudo tee /usr/local/share/ca-certificates/cloudtrips-firewall-root.crt >/dev/null; sudo update-ca-certificates"
The output should report that one certificate was added. Installing a root CA means the machine trusts certificates issued by it, so distribute this trust only to controlled lab systems.
Enable Inspection on the HTTPS Rule
Return to the Premium Firewall Policy. Under Settings > Rules, open the
application rule collection Allow-Approved-Web and edit
Allow-Microsoft-Web.
Keep its existing source, protocols, and destination, and enable:
TLS inspection: EnabledThe rule should still contain:
Source: 10.20.1.0/24
Protocol: HTTPS:443
Destination type: FQDN
Destination: www.microsoft.com
Select Save or Add and wait until the policy provisioning state is Succeeded.
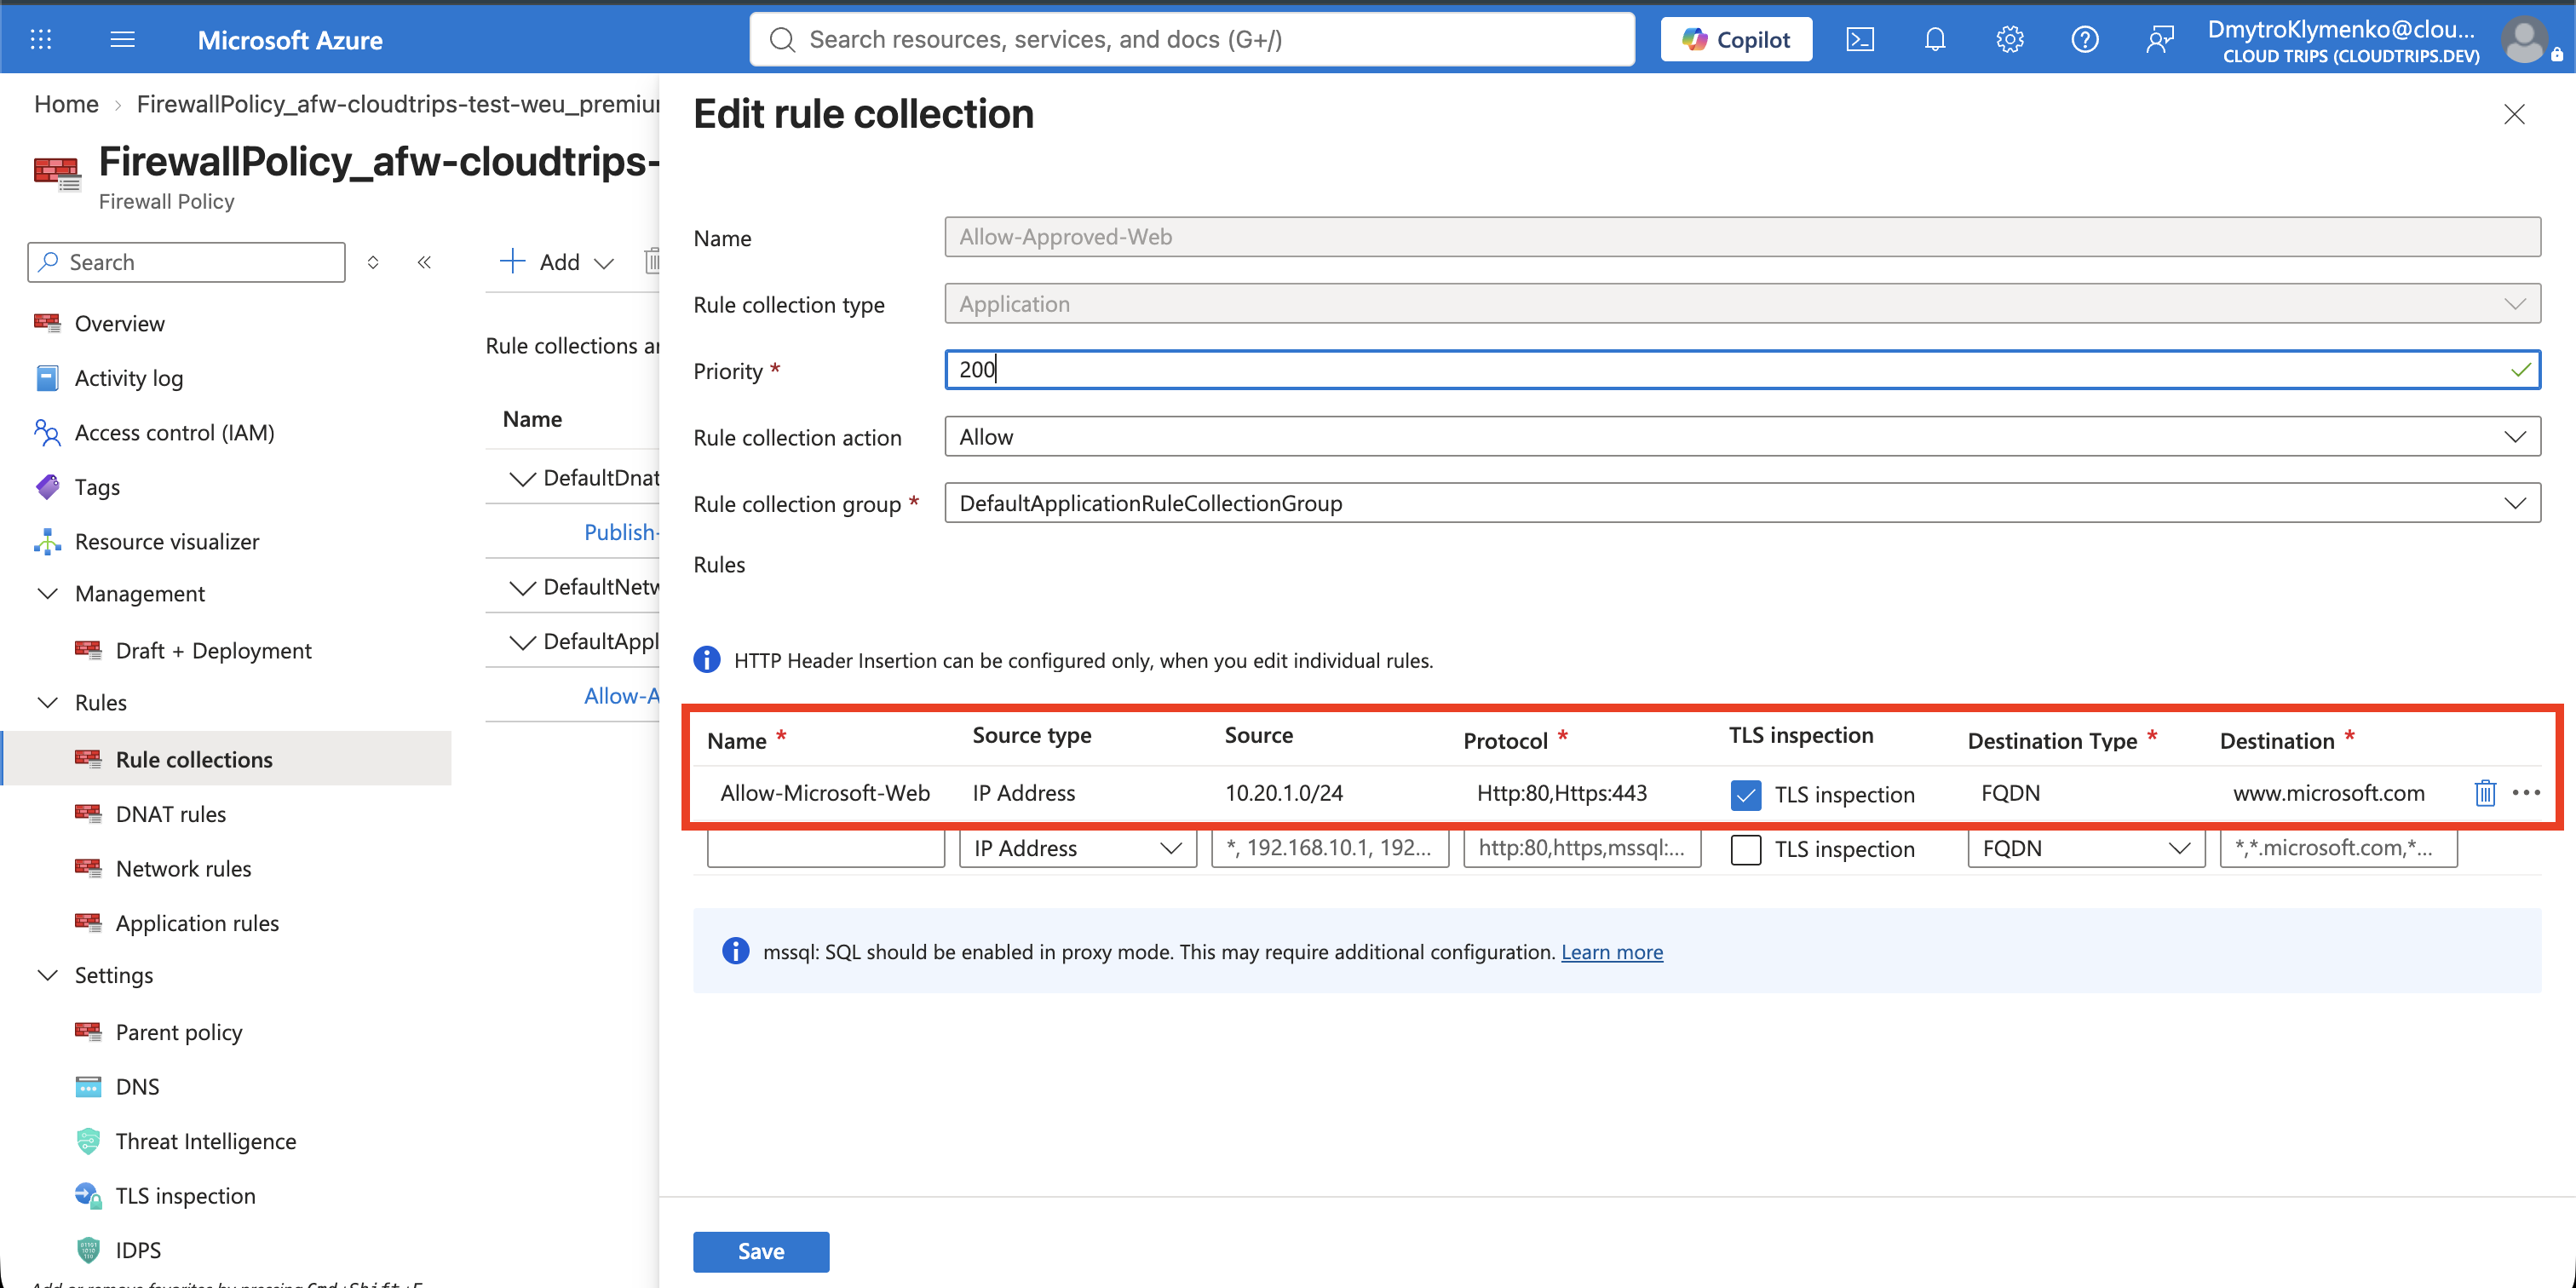
TLS inspection is not automatically applied to every encrypted connection. Only traffic matching an application rule with TLS inspection enabled is decrypted and inspected.
Verify TLS Interception
Start vm-cloudtrips-bastion-test-weu if it is deallocated and connect through
Connect > Bastion. Run:
curl -vI https://www.microsoft.com 2>&1 | grep -E 'issuer:|SSL certificate verify ok|HTTP/'The output should show:
issuer: The generated CloudTrips firewall CA
SSL certificate verify ok
HTTP/2 200, 301, or 302
The exact issuer text and HTTP status can differ. The important evidence is that certificate verification succeeds and the issuer is the generated firewall CA rather than the website’s normal public CA.
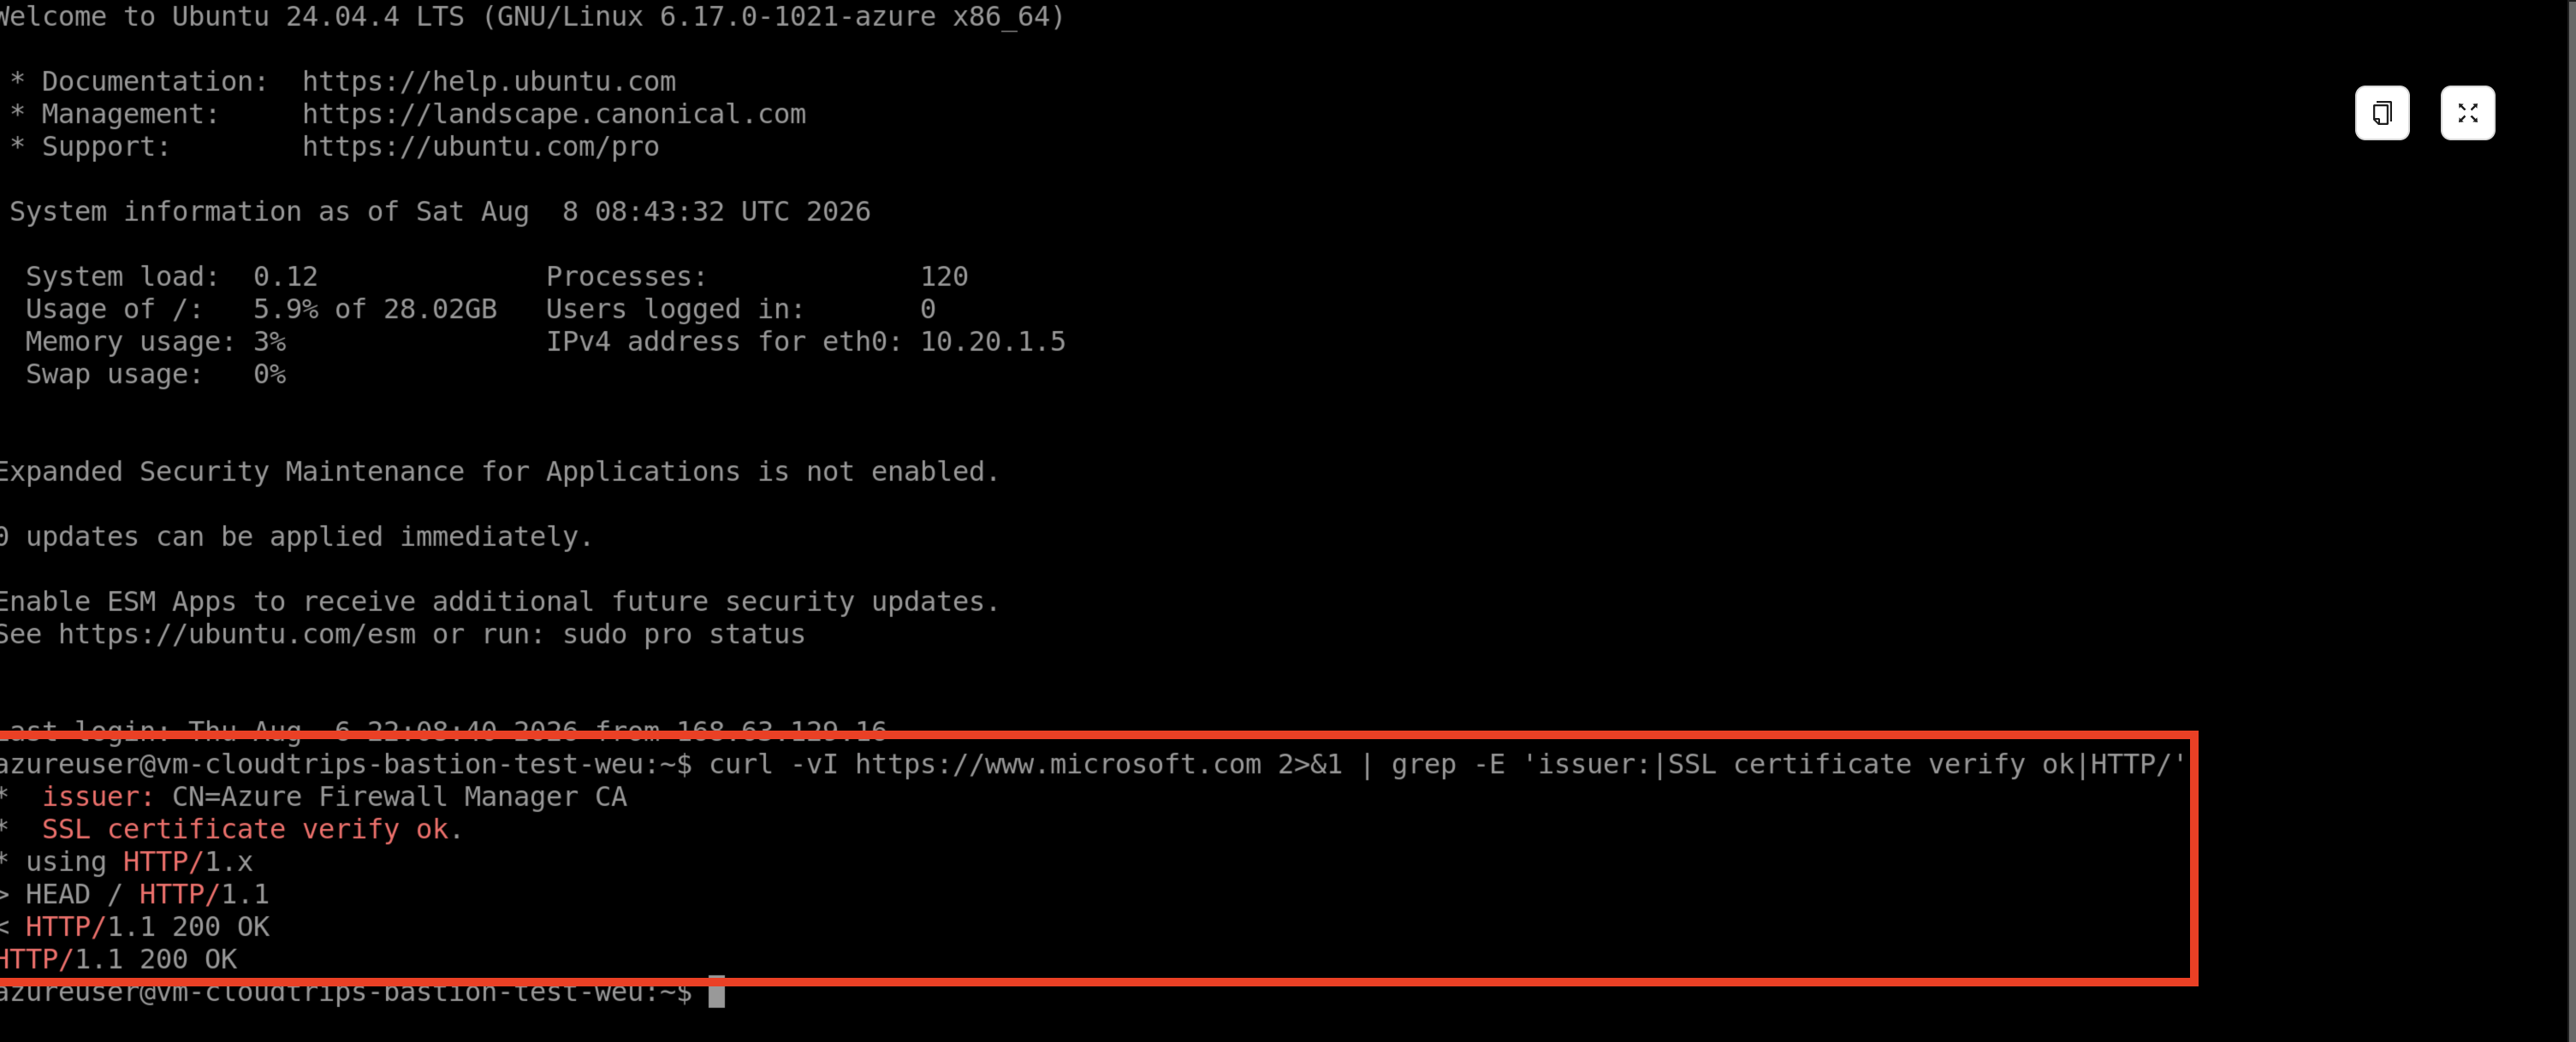
This proves that the VM connected to Azure Firewall’s generated certificate,
the firewall inspected the decrypted session, and the firewall established a
separate TLS connection to www.microsoft.com.
If curl reports error 60, do not use -k as the solution. Confirm that the
downloaded certificate is the CA selected on the policy and rerun
update-ca-certificates on the VM.
Continue or Clean Up
The next trip enables Firewall IDPS. Keep the Premium firewall, Premium policy, generated managed identity, Key Vault, CA certificate, application and DNAT rules, route, and VM. Deallocate only the VM between tests.
If you stop the Premium labs, first disable TLS inspection on
Allow-Microsoft-Web, and then disable it on the policy. Downgrade or delete
the Premium firewall before removing the generated Key Vault, certificate, and
managed identity. Remove the lab CA from the VM with:
sudo rm /usr/local/share/ca-certificates/cloudtrips-firewall-root.crt
sudo update-ca-certificates --fresh
Follow the earlier Firewall Policy cleanup if the complete firewall lab is finished.